Blog Speed Optimization - CDN, Image Compression and HTTP2
I’ve been writing my personal blog for a while now. Previously, I was content as long as it was accessible, without much concern for speed. Recently, when accessing it myself, I felt that the page loading speed was quite slow, significantly affecting the experience. Moreover, slow loading also affects search engine rankings. So I set out to perform a series of optimizations on the blog to improve page loading speed. I encountered quite a few pitfalls along the way, which I’ll record in this article, hoping it will be helpful to others.
First, let me explain the overall architecture of my personal blog. The blog is built using Hexo. It’s hosted on GitHub, and each time a new markdown article is added, it triggers a Github Action to automatically build and generate static files. These static pages aren’t directly hosted on Github Pages, but instead use netlify, as netlify provides free CDN acceleration with acceptable latency for both domestic and international access, and deployment is also very simple.
CDN Acceleration
The first step is CDN acceleration, which is the simplest and most effective method for static pages. The HTML files of the blog are directly accelerated by netlify’s built-in CDN, significantly improving access speeds both domestically and internationally. In addition to static HTML files, there are also some page CSS and JS resources, as well as the most bandwidth-consuming image resources.
CSS and JS Files
For JS and CSS, I also rely on netlify CDN acceleration, just like the blog’s static files. Simply place all these static files in the blog’s theme CSS and JS directories, and then reference them in the blog template.
1 | link(rel='stylesheet', type='text/css', href=url_for(theme.css) + '/normalize.min.css') |
The advantage of this is that after resolving my blog domain, it will load the HTML files and JS together from the CDN. In the case of HTTP2, these files can be loaded in parallel, improving loading speed. Compared to loading these files from other CDNs, it saves DNS resolution, which theoretically should be faster.
However, for font-awesome, because its CSS file references font files, directly placing it in the theme’s CSS directory would require many font files, which is a bit cumbersome. So I referenced CDN resources here, recommending cloudflare, a fast CDN from the “network bodhisattva”. It also has very comprehensive versions of various static libraries, which can be directly searched on the website and then referenced.
1 | link(rel='stylesheet', href='https://cdnjs.cloudflare.com/ajax/libs/font-awesome/6.5.1/css/all.min.css') |
Initially, I placed it on bootcdn, but after using it for a while, I found that the icons wouldn’t load. Upon checking, it seemed that the icon font files on the CDN were corrupted, but it was never fixed, so I abandoned it.
Image CDN
In fact, what affects page loading speed the most are images, so the key point of optimization is images. Here, the images were originally stored on Tencent Cloud COS, and access was directly using COS links. There are several aspects to image optimization. Let’s first look at CDN acceleration, and we’ll expand on image compression and adaptivity later.
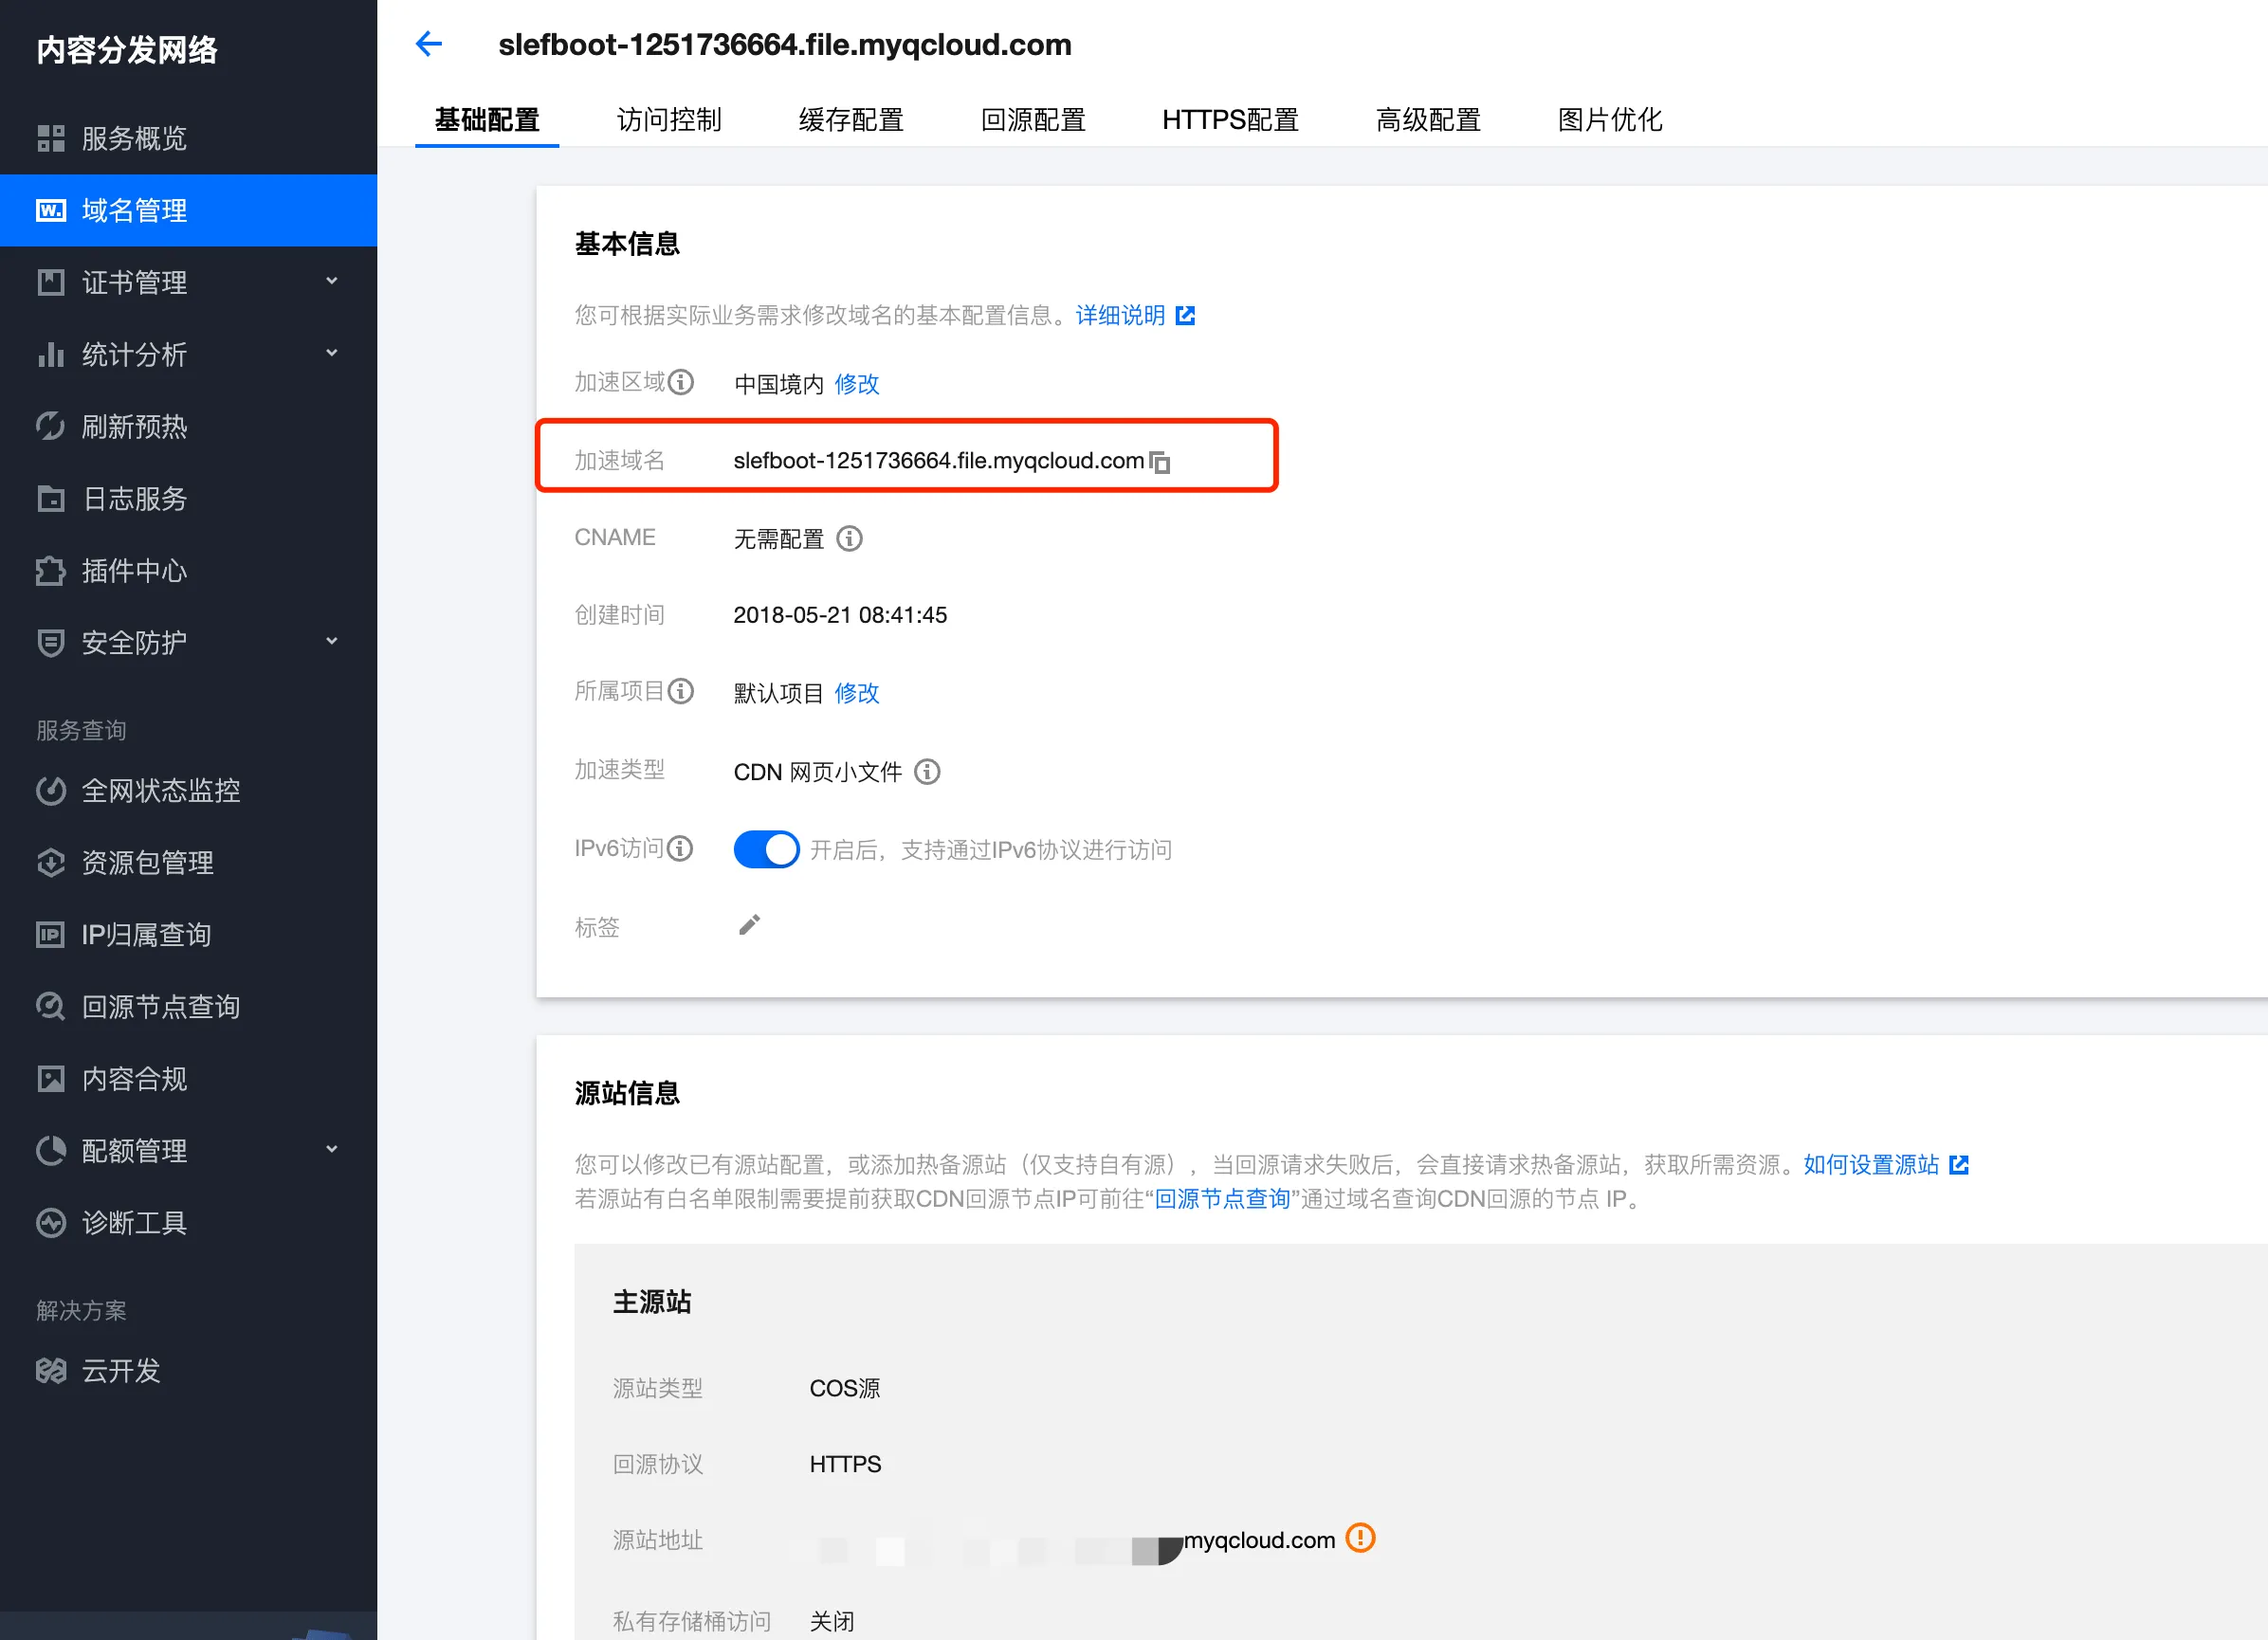
Taking Tencent Cloud CDN as an example, enabling CDN for COS storage is quite simple. Before May 9, 2022, it supported default CDN acceleration domains, only requiring simple activation. However, now you can only use custom domains, and if you’re doing domestic acceleration, the domain needs to be filed. The configuration is very simple, basically just setting up the accelerated domain and the source station address.
After configuring the CDN, you can see real-time request data through Tencent Cloud’s real-time monitoring. This includes information on bandwidth, request volume, traffic hit rate, number of requests, request result status codes, etc. Additionally, through data analysis, you can see information such as the Top 1000 accessed URLs, number of unique IP accesses, Top 100 Referrers, distribution of visitor regions, etc.
The CDN also has a log service that provides hourly access log downloads. These contain information such as request time, client IP, accessed domain, file path, byte size, province, ISP, HTTP return code, Referer, request-time (milliseconds), UA, Range, HTTP Method, HTTP protocol identifier, cache Hit/Miss, etc., which can be used for analysis.
What I use quite often is refresh and prefetch. For example, if an image in the blog has already been cached to the CDN, but I’ve changed the image and uploaded it to COS, I can refresh the cache here so that the latest version of the image is in the CDN cache.
Besides Tencent Cloud’s CDN, there are CDNs from various major cloud vendors. Domestic acceleration all requires domain filing, which is a bit troublesome. You can try Cloudflare’s R2 storage combined with CDN acceleration, the free quota should be enough for personal blogs.
CDN Anti-Scraping
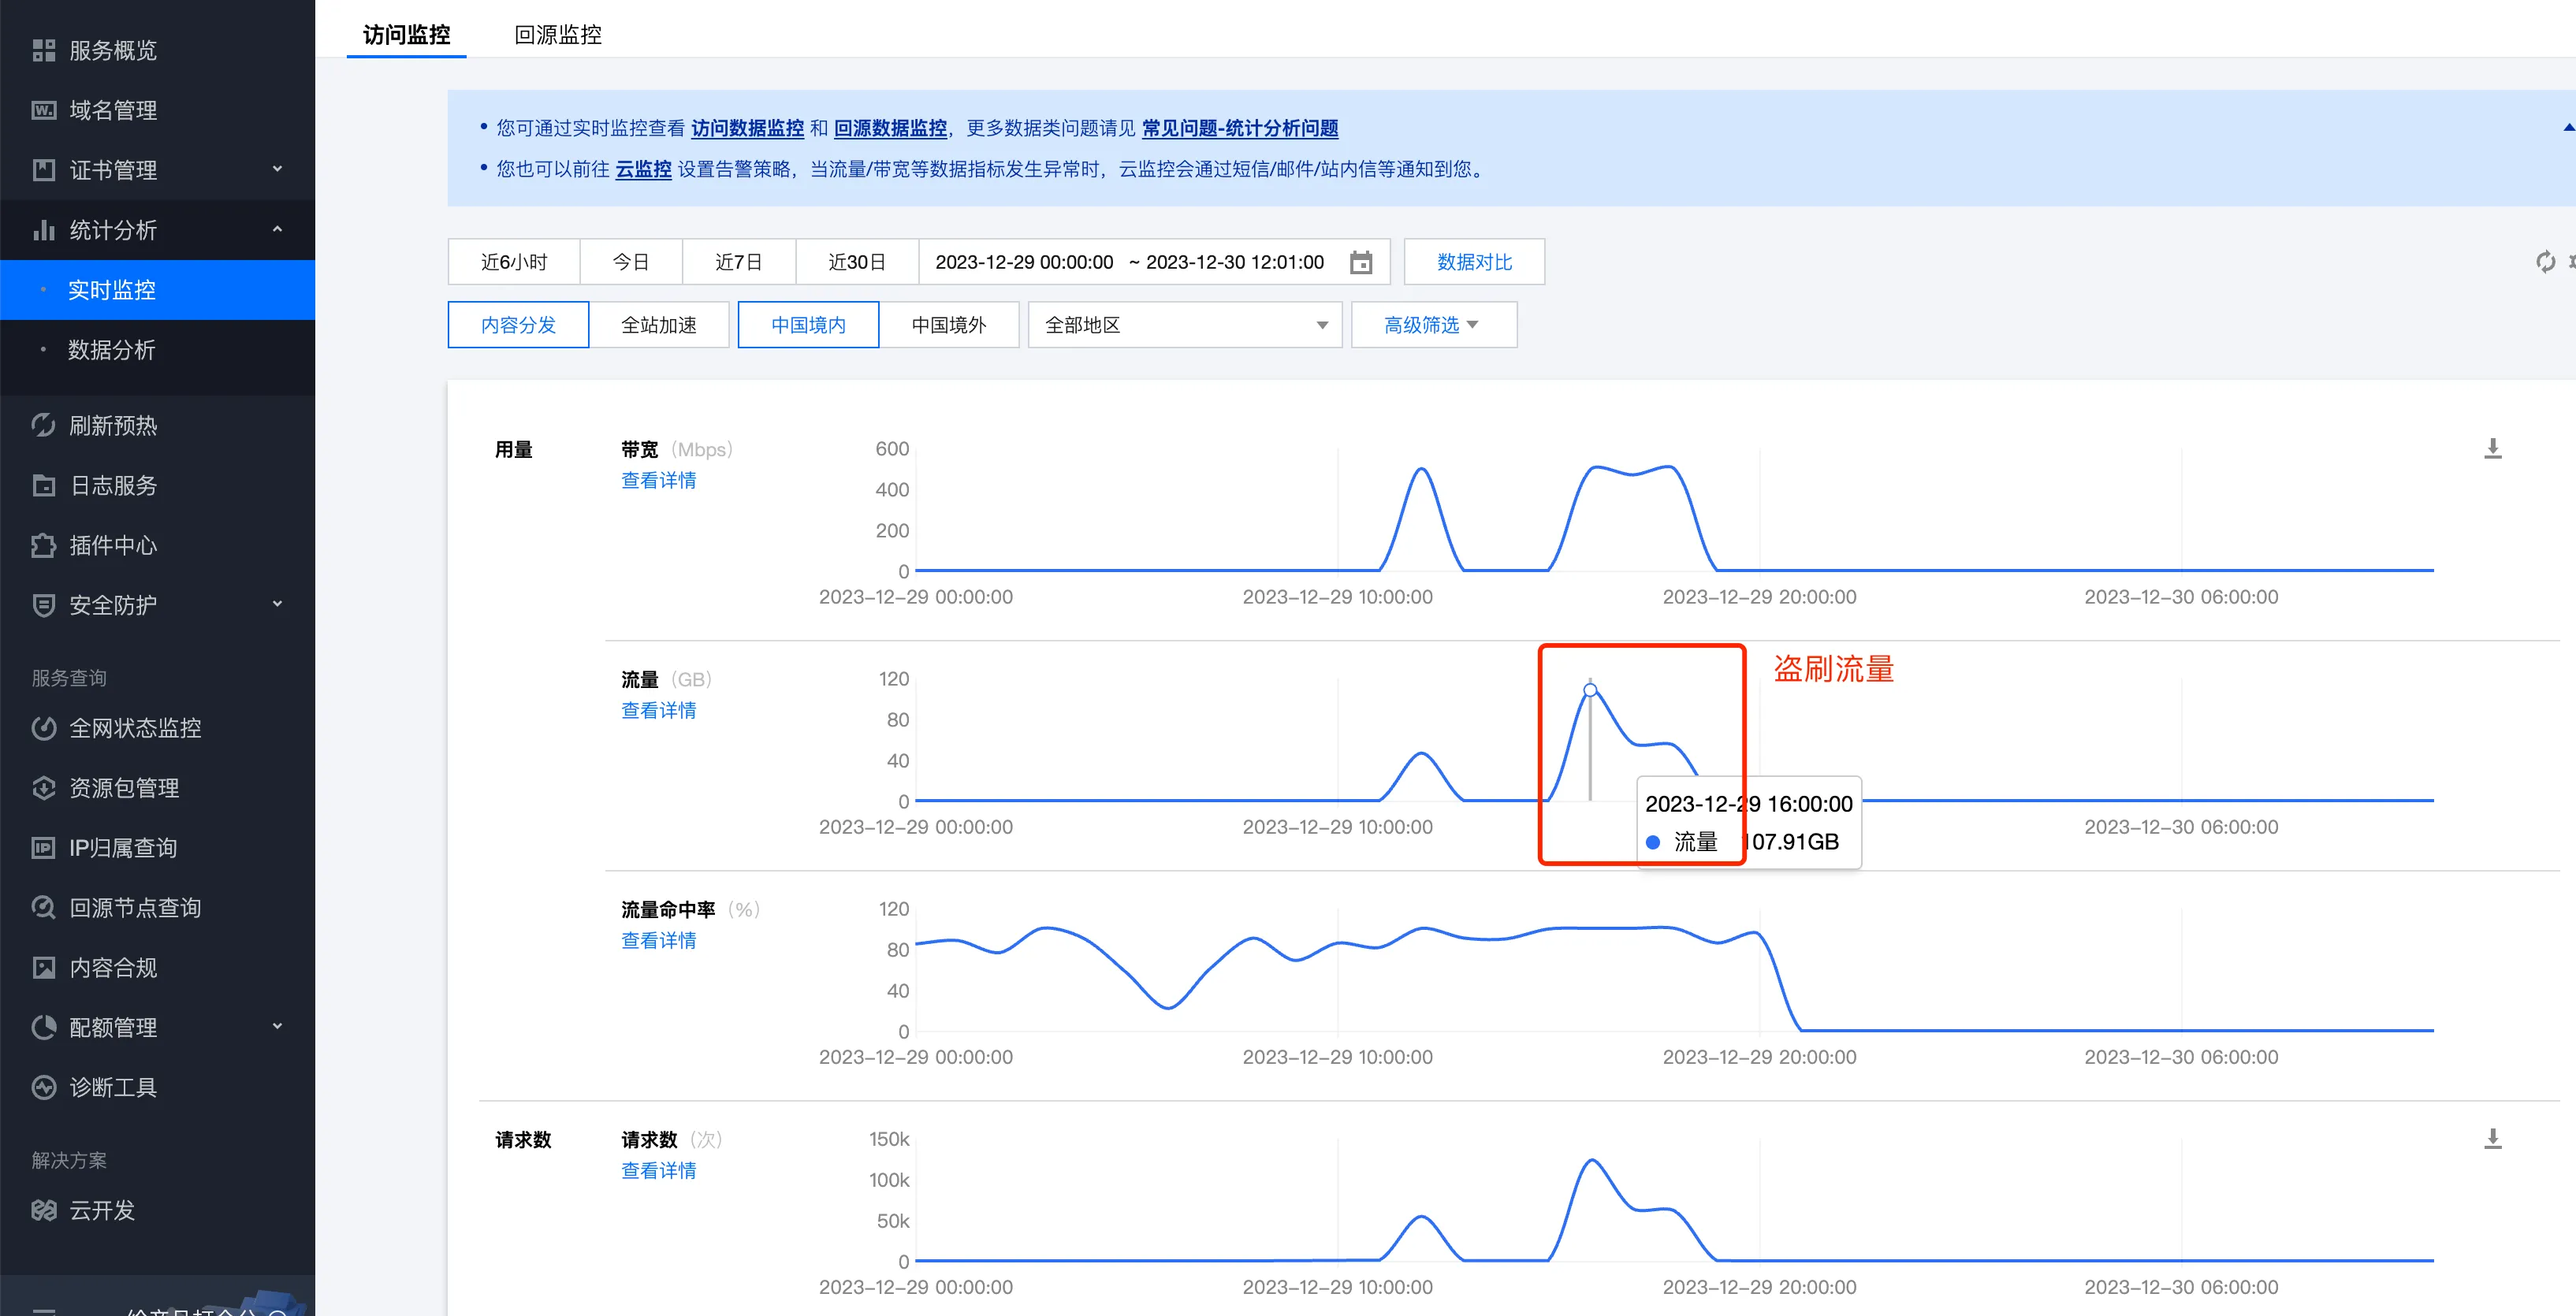
After putting blog images on the CDN, due to an article Looking at the Black Industry’s Search Engine Ranking Optimization Business from Peripheral Traffic Posts, I must have offended someone, so the CDN traffic for my images was scraped, resulting in my Tencent Cloud account even going into arrears. Let me explain here, generally CDNs are billed based on traffic, and on Tencent Cloud, 100GB domestic traffic usually costs 20 yuan. For personal blogs, the traffic is usually very small, so the CDN cost here is basically negligible. But if someone scrapes the traffic, it will cause the CDN cost to skyrocket. If no protection is in place, scraping is very simple, just continuously sending requests to pull your images.
The image below shows the monitoring of my CDN being scraped. On December 29, 2023, in less than 3 hours, about 200G of traffic was scraped, equivalent to nearly 40 yuan in fees. Of course, the black industry probably still showed some mercy, otherwise they could easily have bankrupted me.
Of course, there are some conventional practices to counter CDN traffic scraping. Tencent Cloud’s High-bill Risks from Attacks document introduces it well, mainly three types of methods:
- Access Control. There are many types here, such as hotlink protection, mainly to prevent other websites from using your images. IP blacklist and whitelist configuration, find the attacker’s IP and add them all to the blacklist, although professional black industry operators may have many IPs, making it hard to block them all. At this point, configure an IP frequency limit, giving each IP only 10 QPS, which can greatly increase the cost for attackers.
- Traffic Management. A bottom-line solution provided by Tencent Cloud CDN. For example, if traffic reaches 100 MB within 5 minutes, or 10GB per day, it automatically shuts down the CDN to prevent accidentally generating high bills.
- Security Protection. Requires paid purchase, which is a bit overkill for personal blogs, so I haven’t used it yet.
The basic principle of countering the black industry here is to increase the cost for attackers without affecting the normal user experience. At the same time, if it can’t be prevented, try to keep the loss controllable. Below is part of the security protection for my blog image CDN on Tencent Cloud.
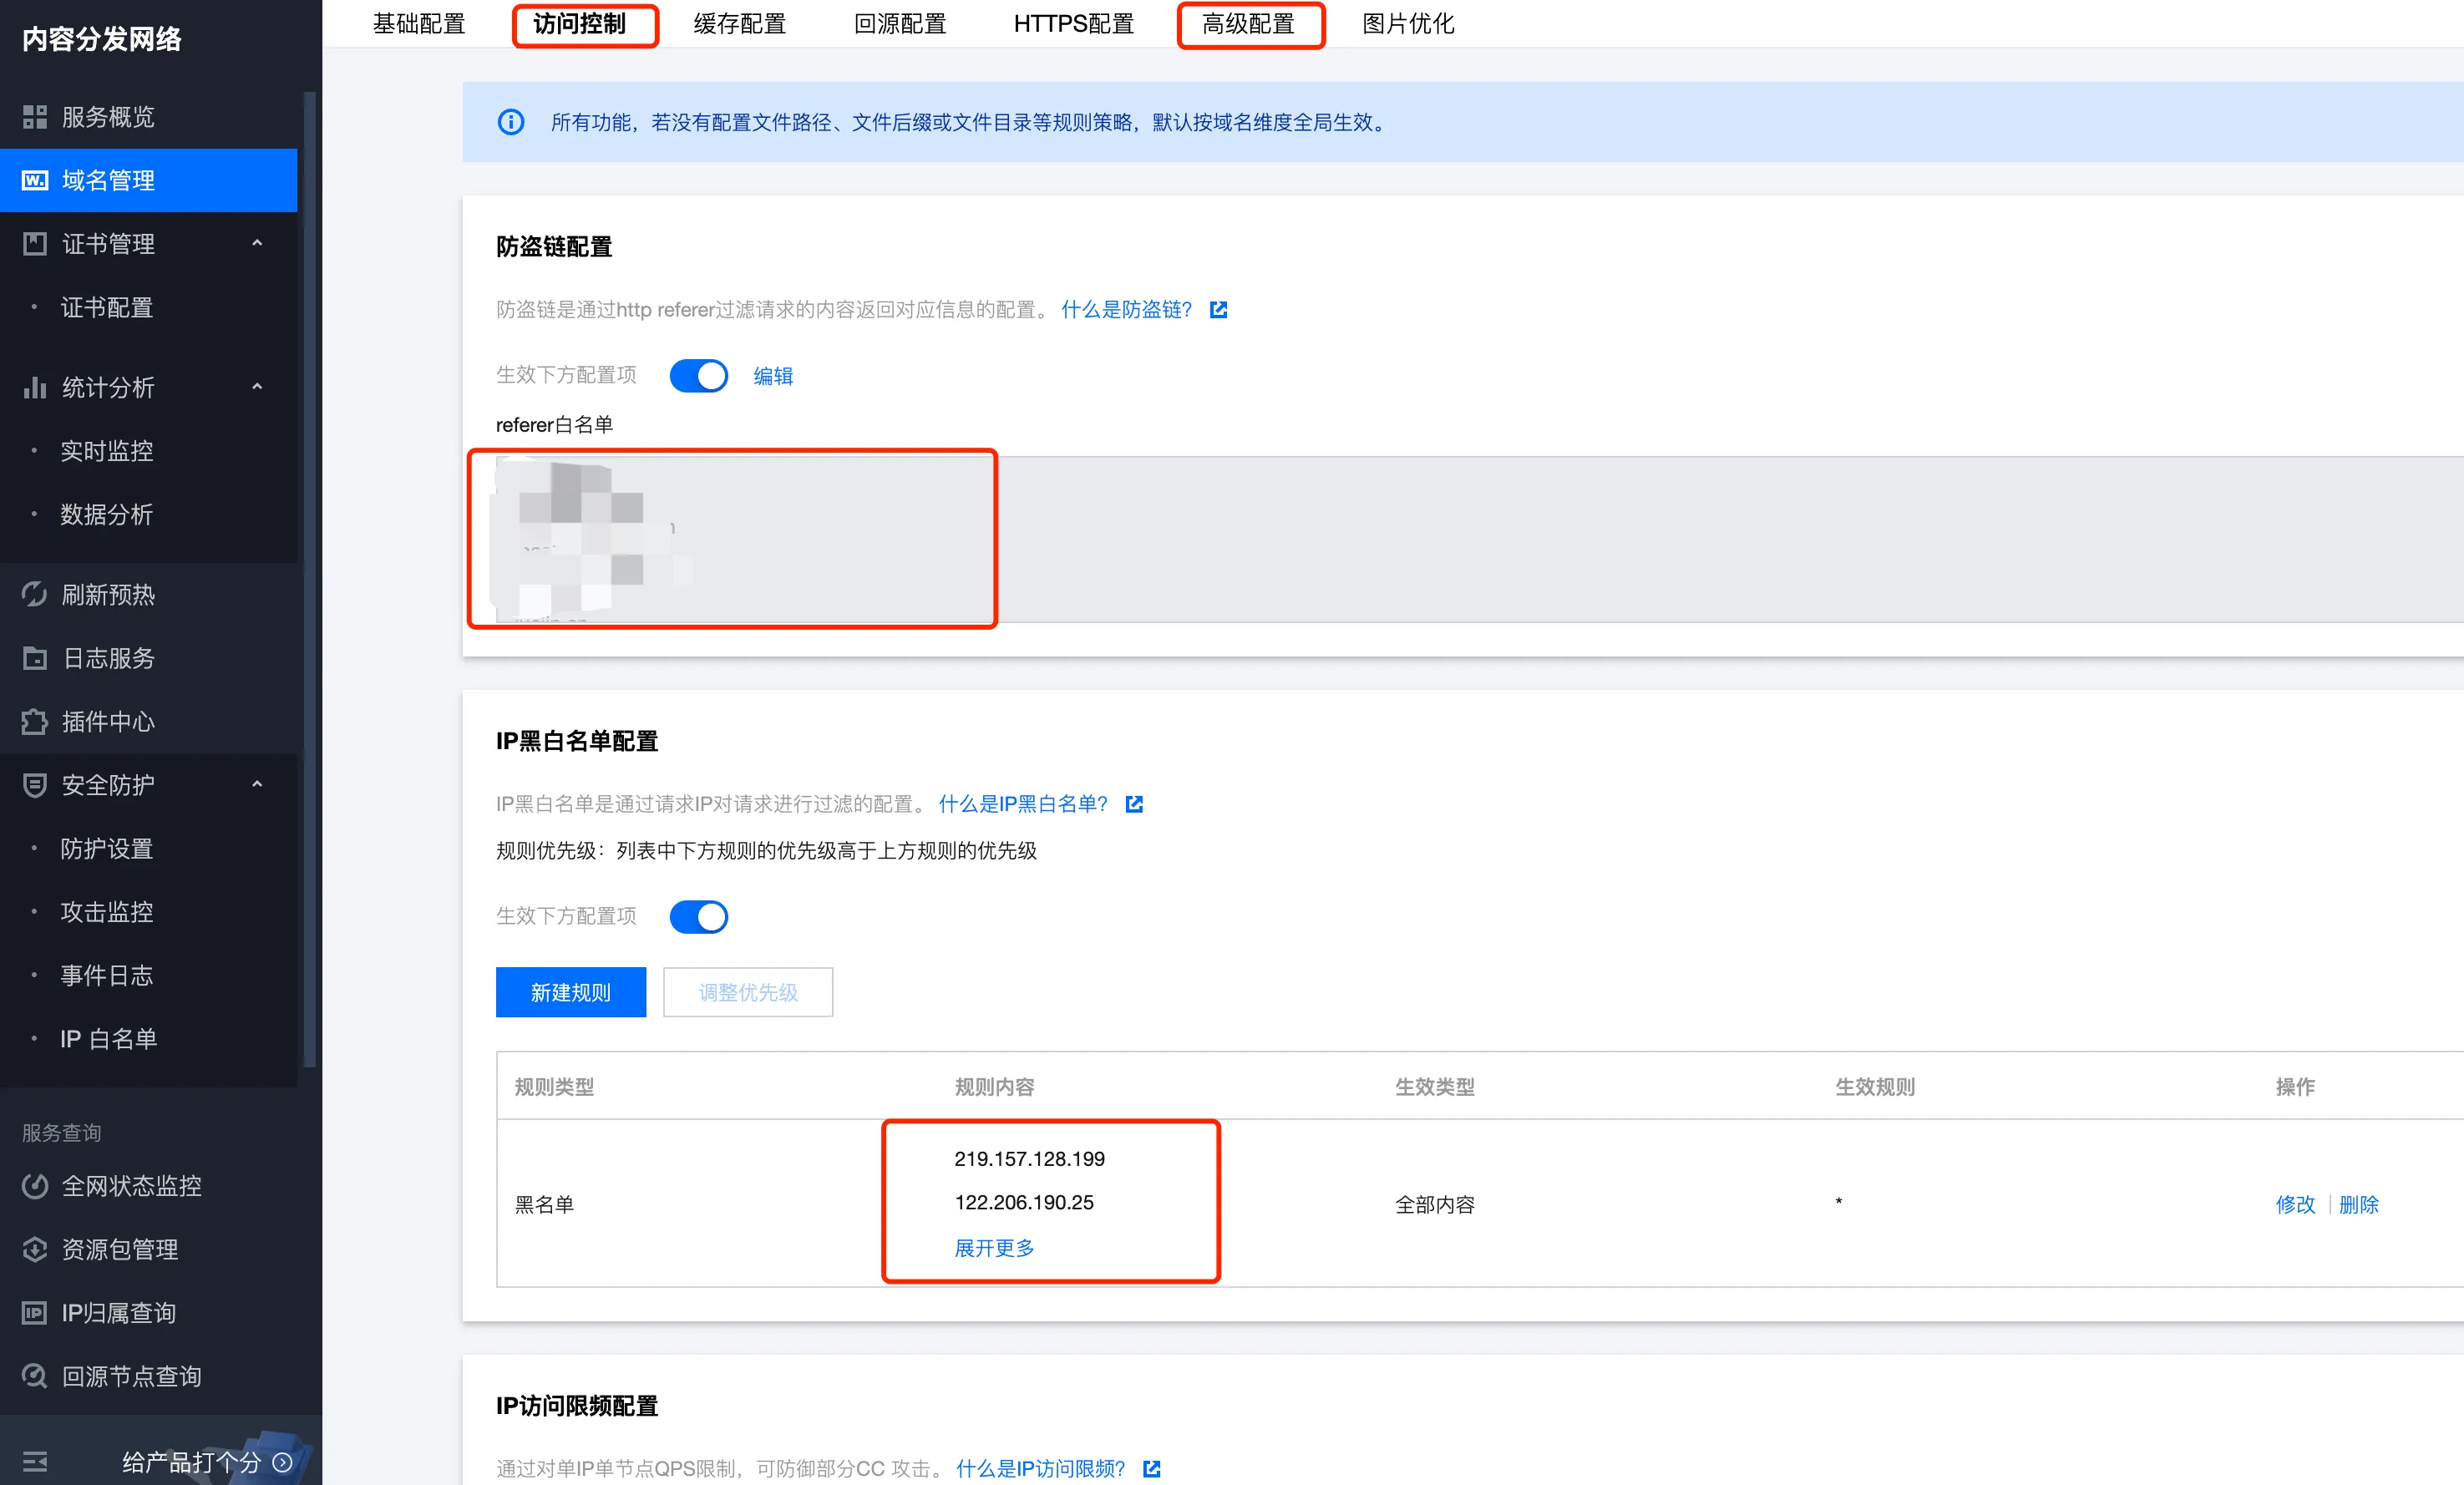
Image Optimization
After implementing CDN, I tested with PageSpeed Insights and found that image loading was quite time-consuming. There are mainly two optimization methods:
- Optimize image format, using WebP format. The blog images were previously all PNG, although they were automatically compressed before uploading to COS, they were still quite large. WebP is an excellent modern image format, with lossless images 26% smaller compared to PNG.
- Responsive images. This means loading different sized images based on screen size, for example, loading small images for mobile screens and large images for computer screens. This can reduce the loading traffic and improve loading speed.
Image Format Optimization
The most intuitive method here is to convert all existing blog images to WebP format, re-upload them to COS, and then replace the image links in the blog posts. However, while looking at Tencent Cloud’s documentation, I found that COS has an image processing function that can complete image format conversion by adding parameters after the image link. For example, if my image address is https://slefboot-1251736664.file.myqcloud.com/20240102_hexo_blog_speed_http2.png, just adding /webp at the end of the link will get a much smaller WebP image.
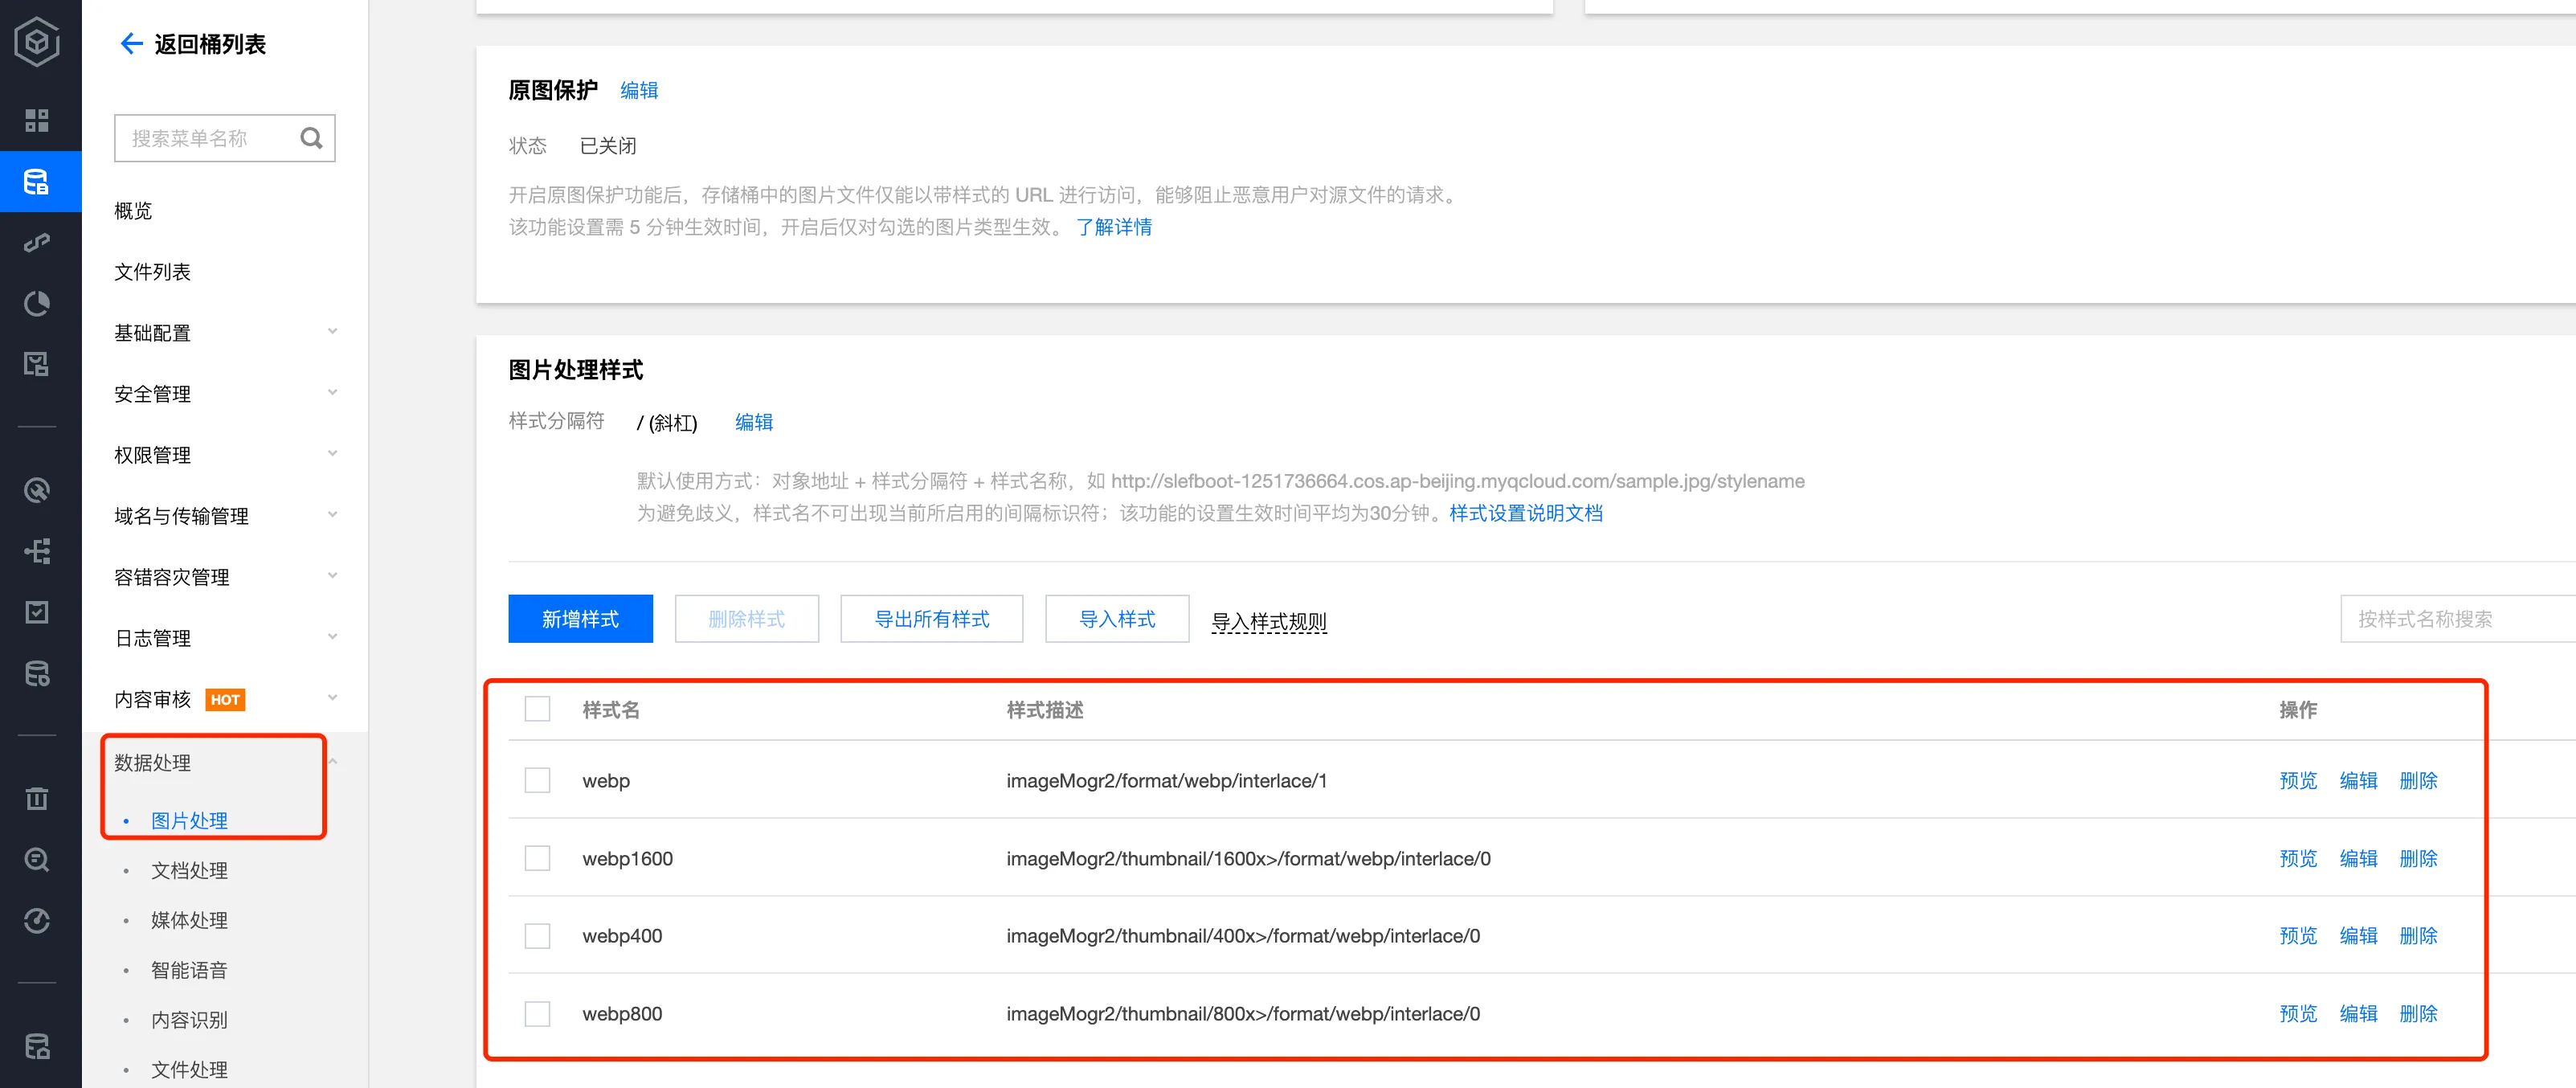
The overall configuration is also very simple. Open the data processing, image processing of the COS bucket, then add styles in image processing styles. For the format conversion example above, the style description is imageMogr2/format/webp/interlace/1. Tencent Cloud uses CI (Cloud Infinite) image processing, which supports quite a few processes, including image scaling, cropping, rotation, format conversion, watermarking, Gaussian blur, and so on. Here I only used format conversion, you can check the documentation for others.
The image below shows the few conversions I used, where webp is the original image converted to WebP format, and webp400 is converted to an image with a width of 400 pixels, used for display on smaller devices.
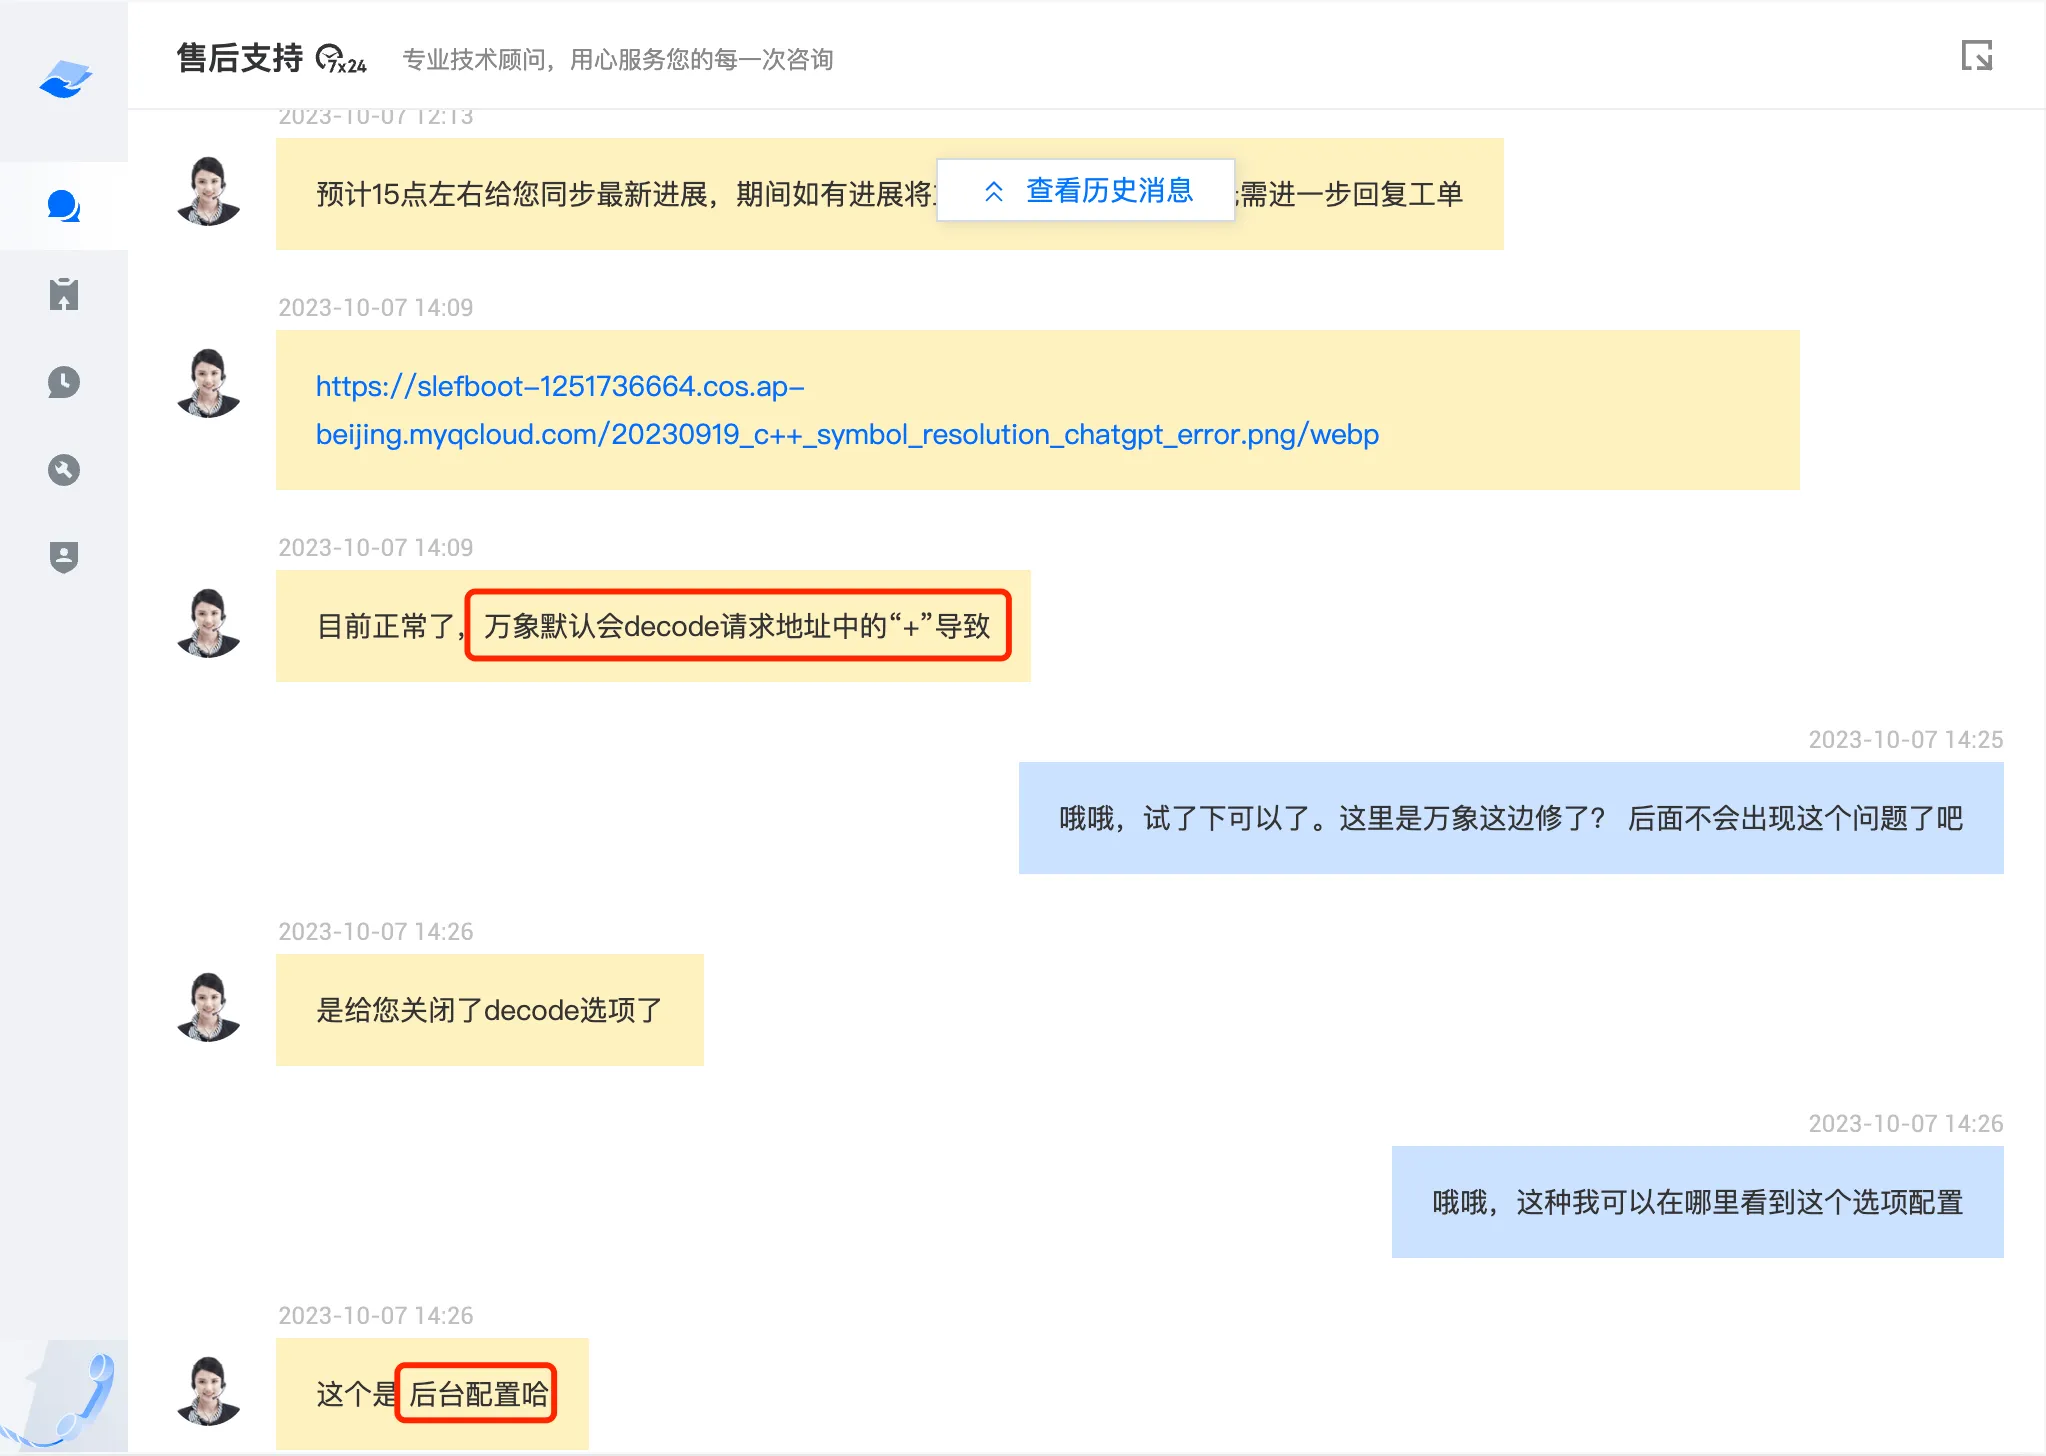
During the blog writing process, the image links are still normal PNG links, and then when hexo builds static files, use a JS script to batch add styles to the image links in the articles. I also encountered a pitfall here. In the generated webp, some image links returned 404, but the files existed on COS. After contacting customer service and going through several rounds, they finally located the problem. CI decodes the + sign in the URL when parsing the URL. Then customer service, through their own backend, turned off this decode option for my bucket.
Responsive Images
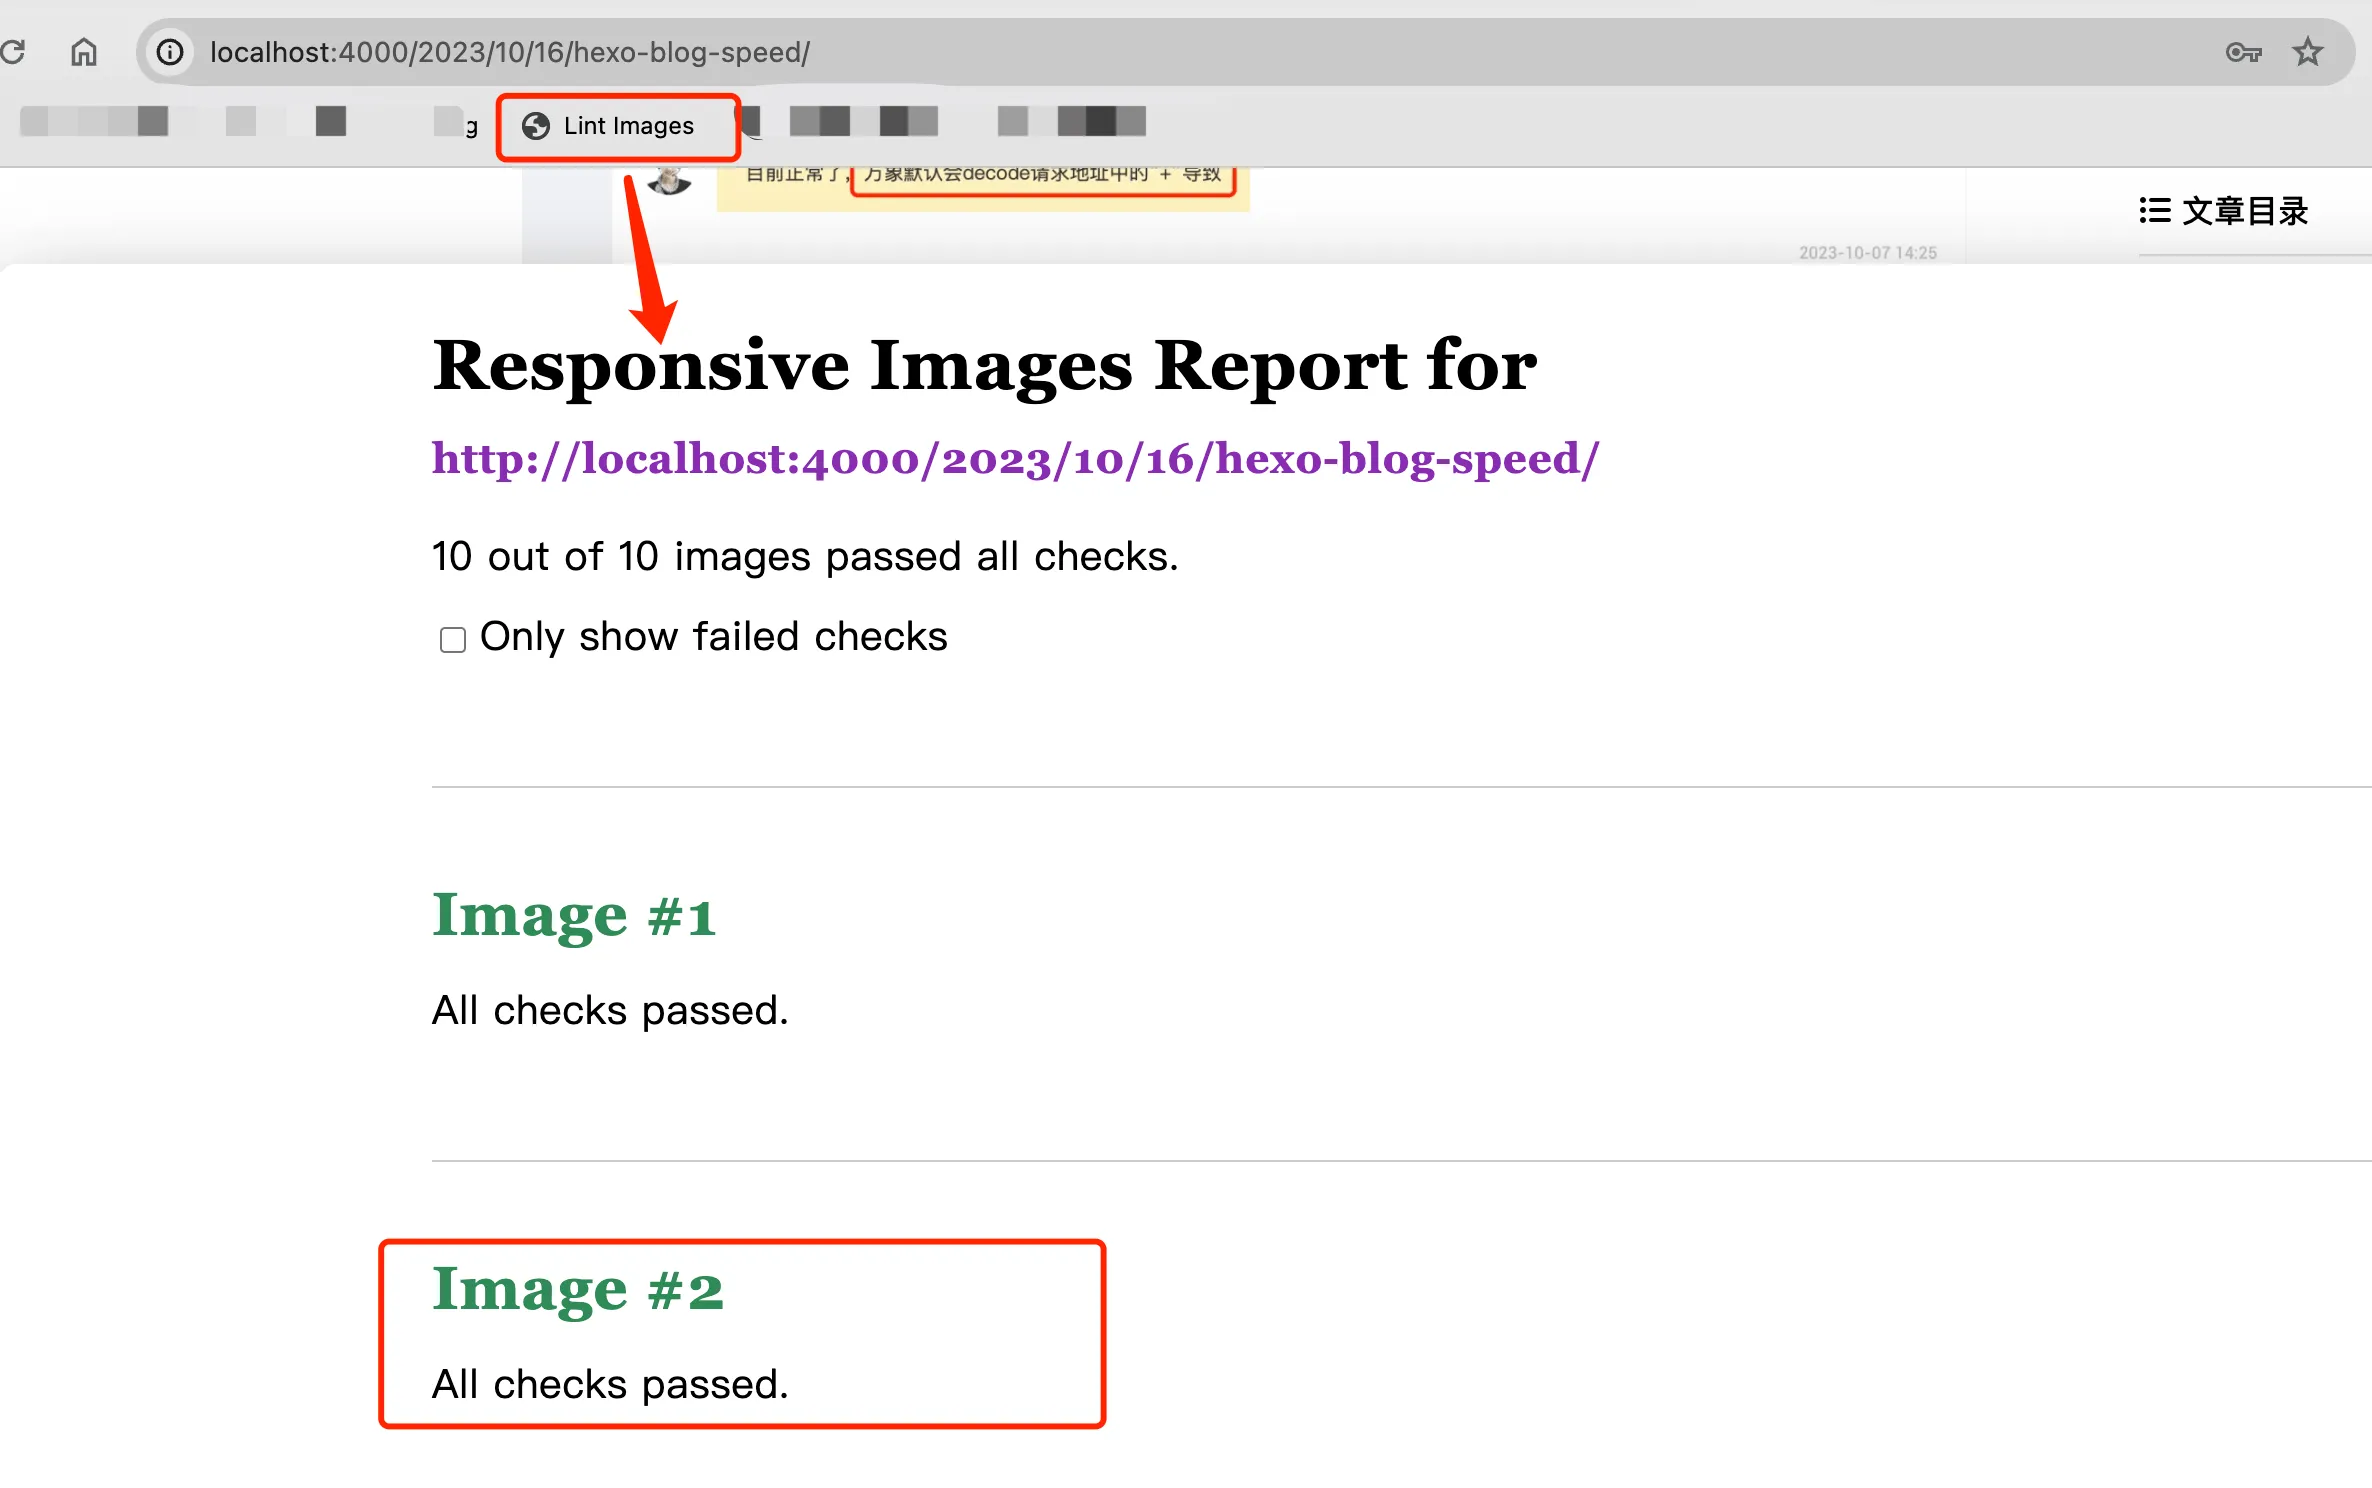
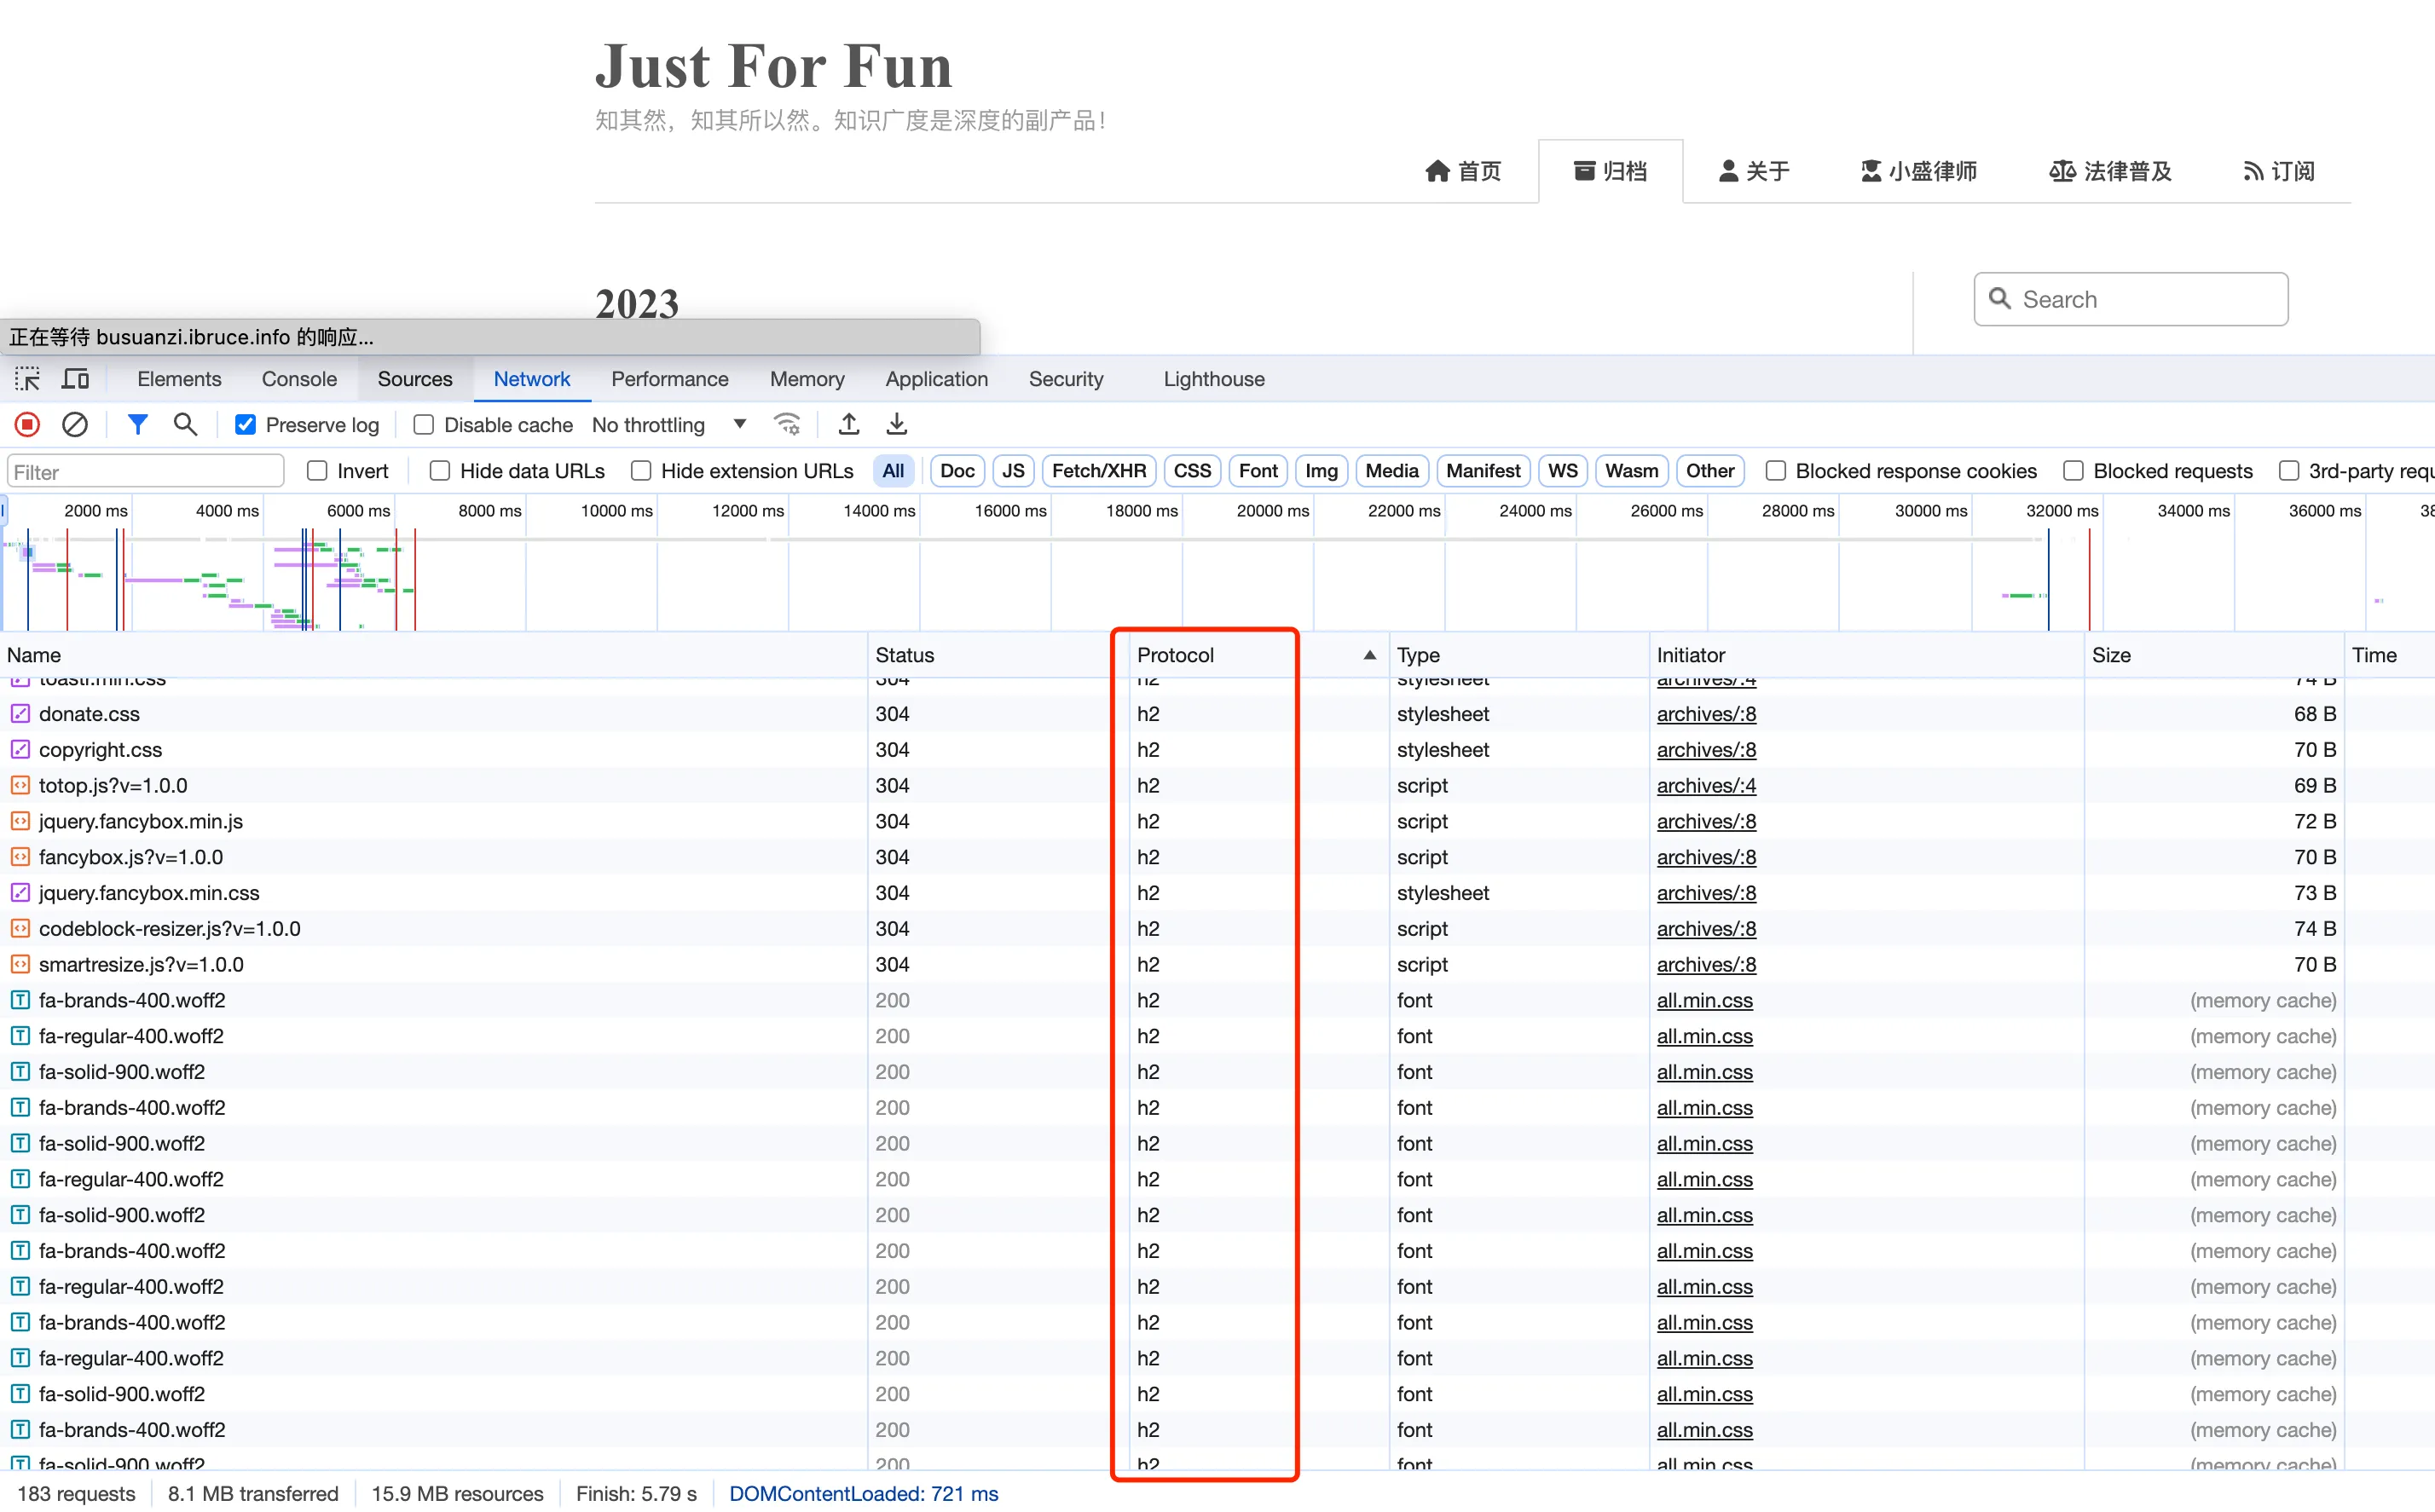
In the format conversion mentioned earlier, I mentioned that I created multiple styles corresponding to different sizes of WebP images. The next step is to decide which size image to load based on the device’s pixel size. Before processing, I recommend a tool, RespImageLint, which can check whether the image sizes on the page are reasonable.
After adding this tool to the browser tab, visit an article page on the blog, then click the Lint Images tab, and the tool will simulate devices of various sizes to visit the page and see if the images requested by the browser are reasonable. Finally, it will generate a report listing the check results for each image. As shown below:
Of course, this is the check result after I used responsive images. If you haven’t done responsive images, there would be many warnings. The basic idea of responsive images here is to use CI to provide multiple versions of sizes for each image, and then specify which version of the image to use on devices with different pixels through media queries, viewport size attributes, etc. Specifically in my blog, when hexo renders HTML, use a js script to replace image links, adding srcset and sizes attributes.
- Set the srcset attribute. The srcset attribute is used to specify different size sources for the image, allowing the browser to choose the appropriate image version based on the device’s screen size and resolution.
- Set the sizes attribute. The sizes attribute defines the layout width that the image should use at different viewport widths, allowing the browser to more accurately select the appropriate image from srcset.
- Update image attributes, update the src, width, and height attributes of the img tag to ensure proper rendering and proportion of the image.
Specifically, create a scripts directory in the root directory of the hexo project, then create an img.js file with the following content:
1 | const cheerio = require("cheerio"); |
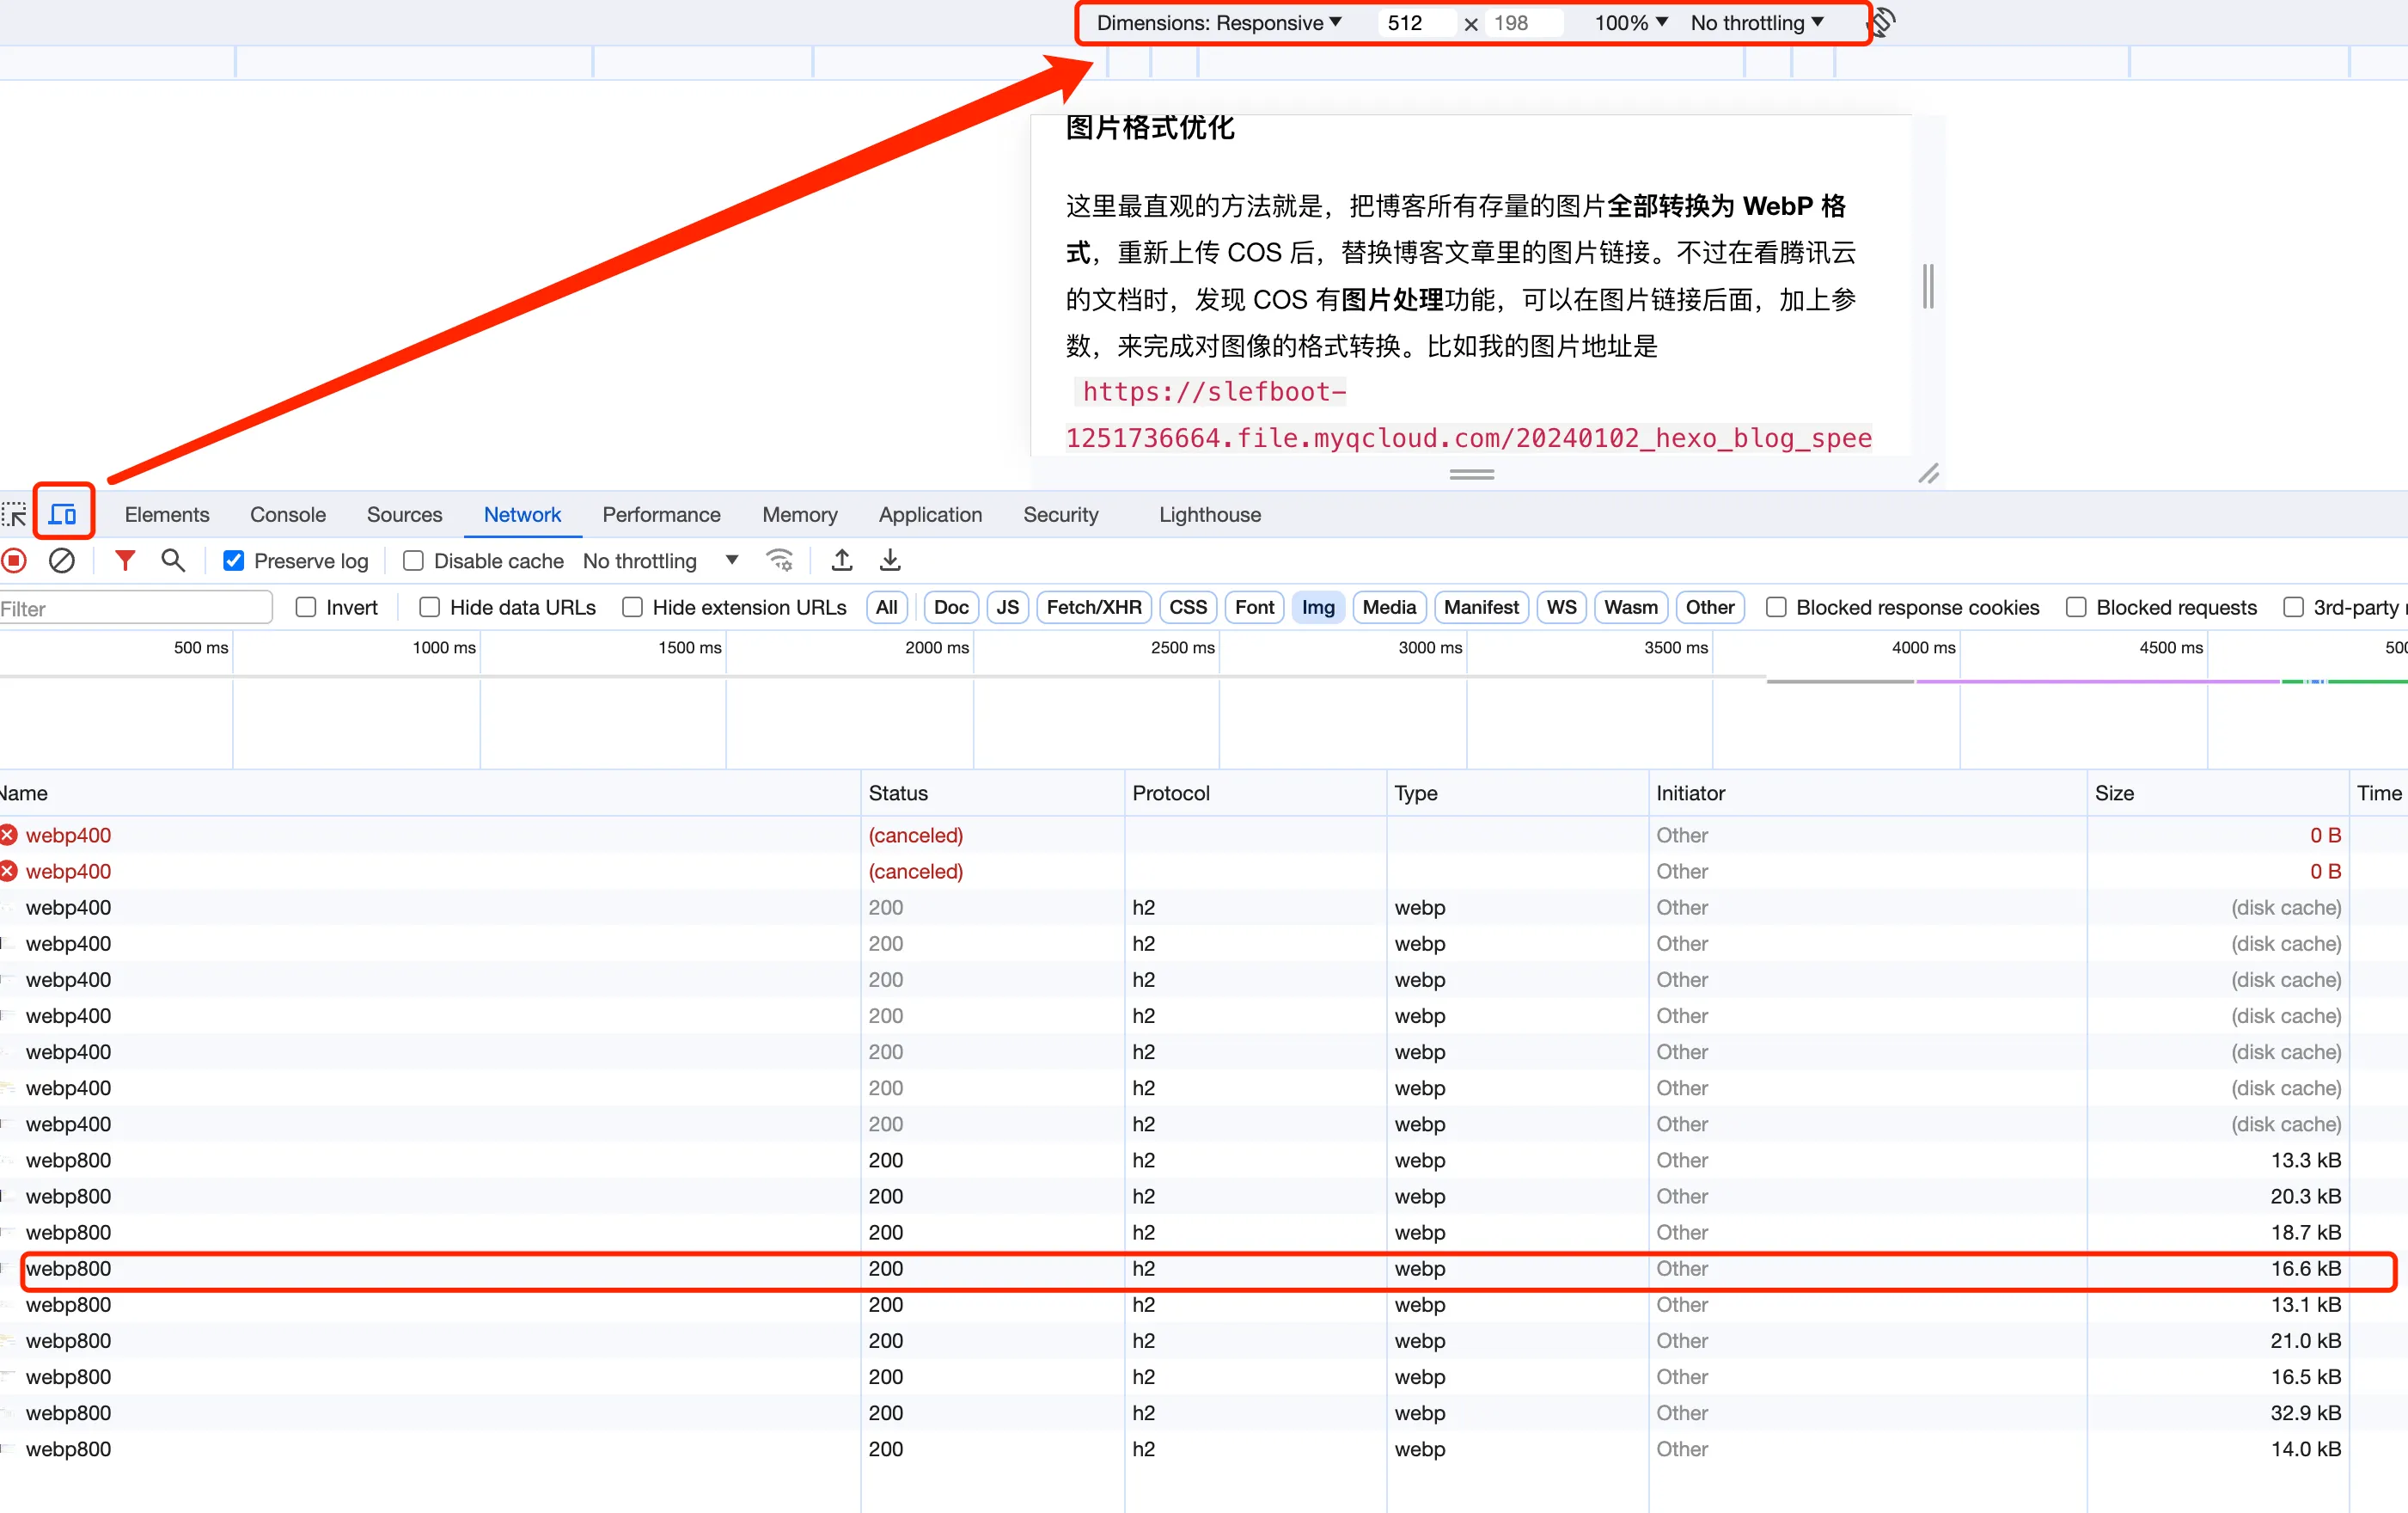
Then when hexo renders, it will call this script to process the image attributes. The rendered result is as follows:
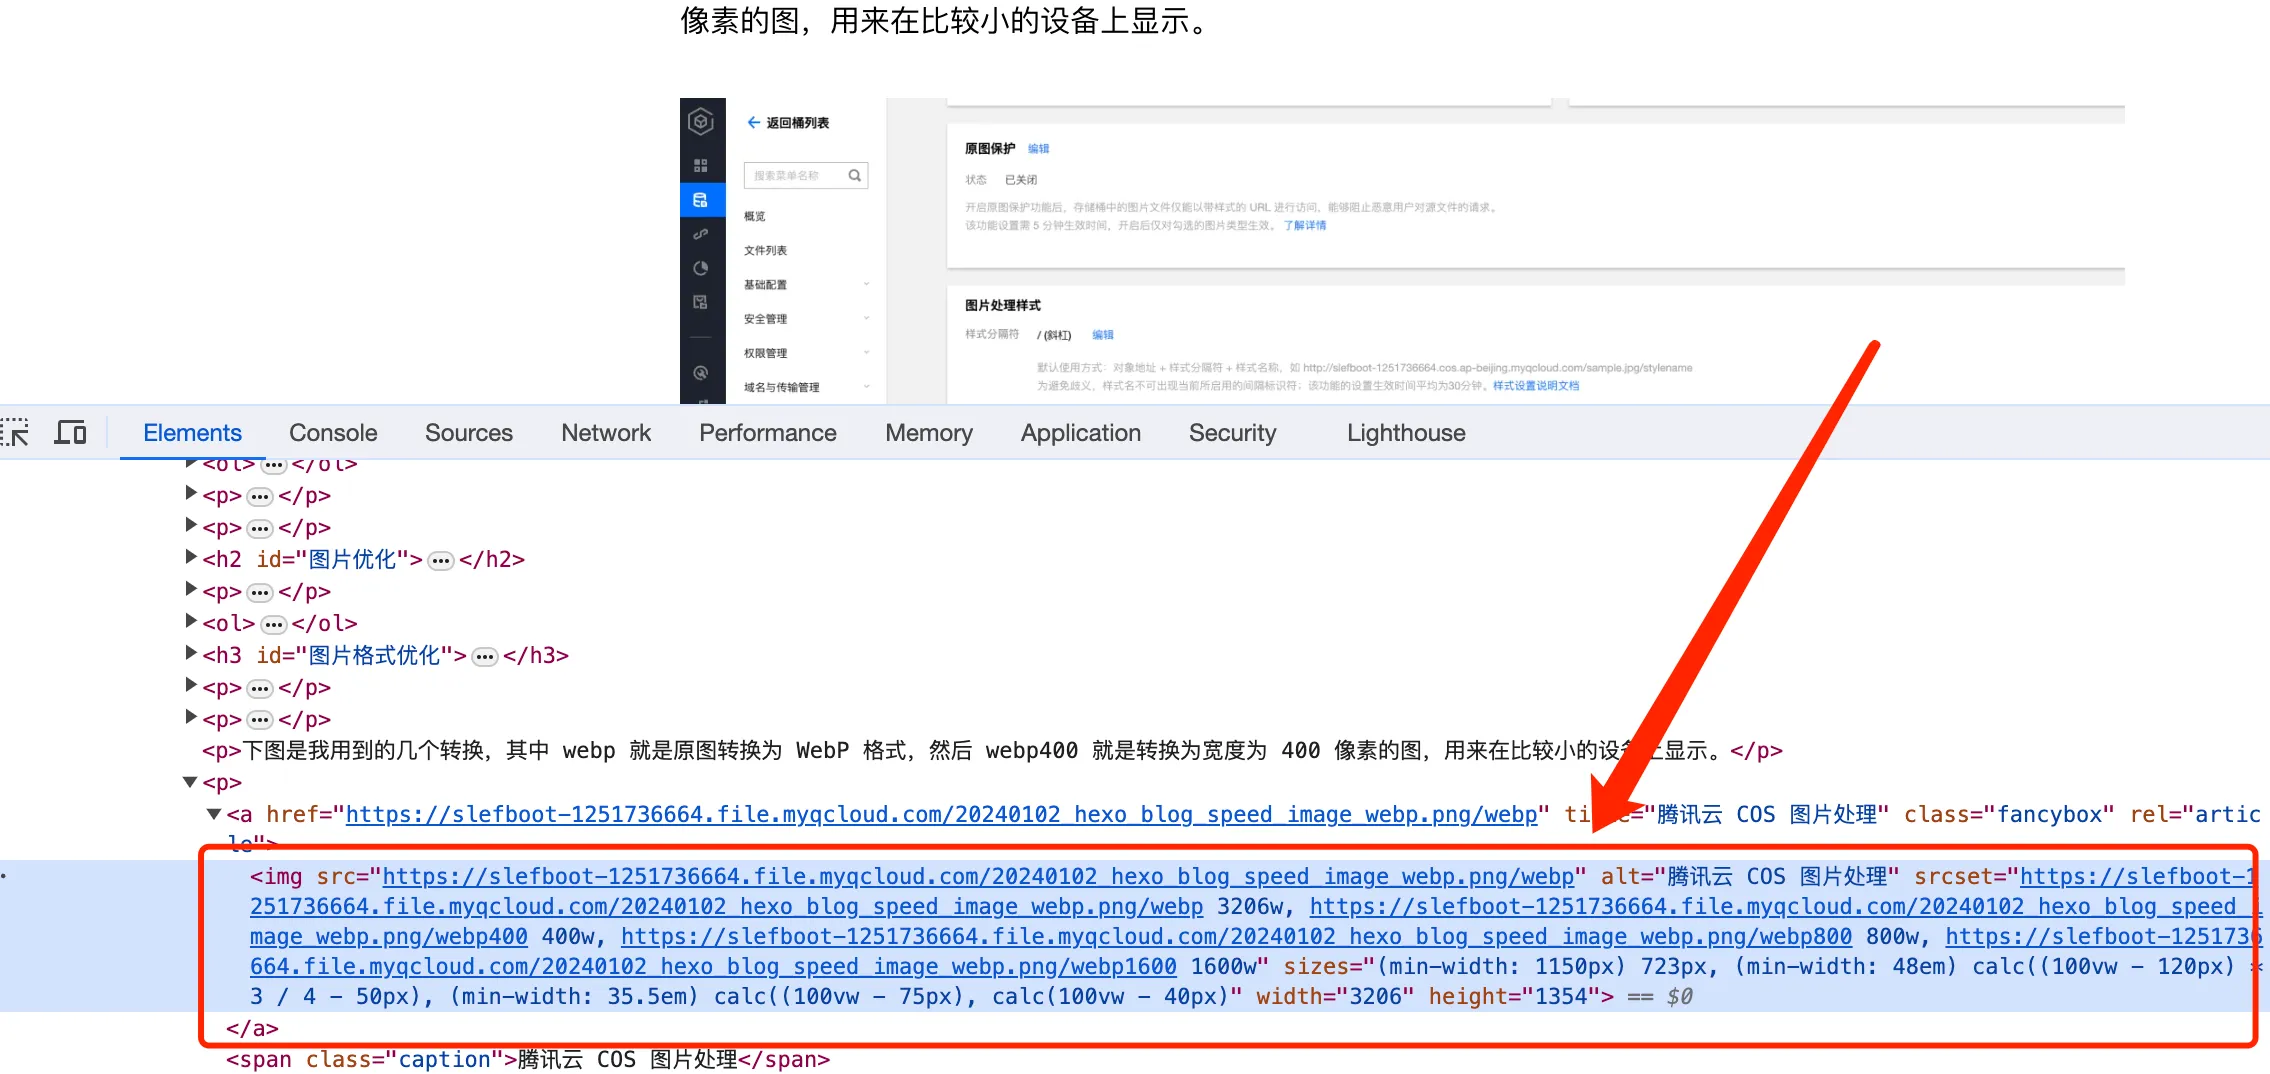
Then you can select different screen sizes in the browser’s developer tools, and look at the Network tab in the requests to see which image version the browser specifically chooses. As shown in the image below, on small sizes it chooses the 400 image, and on medium sizes it’s the 800 image.
HTTP 2
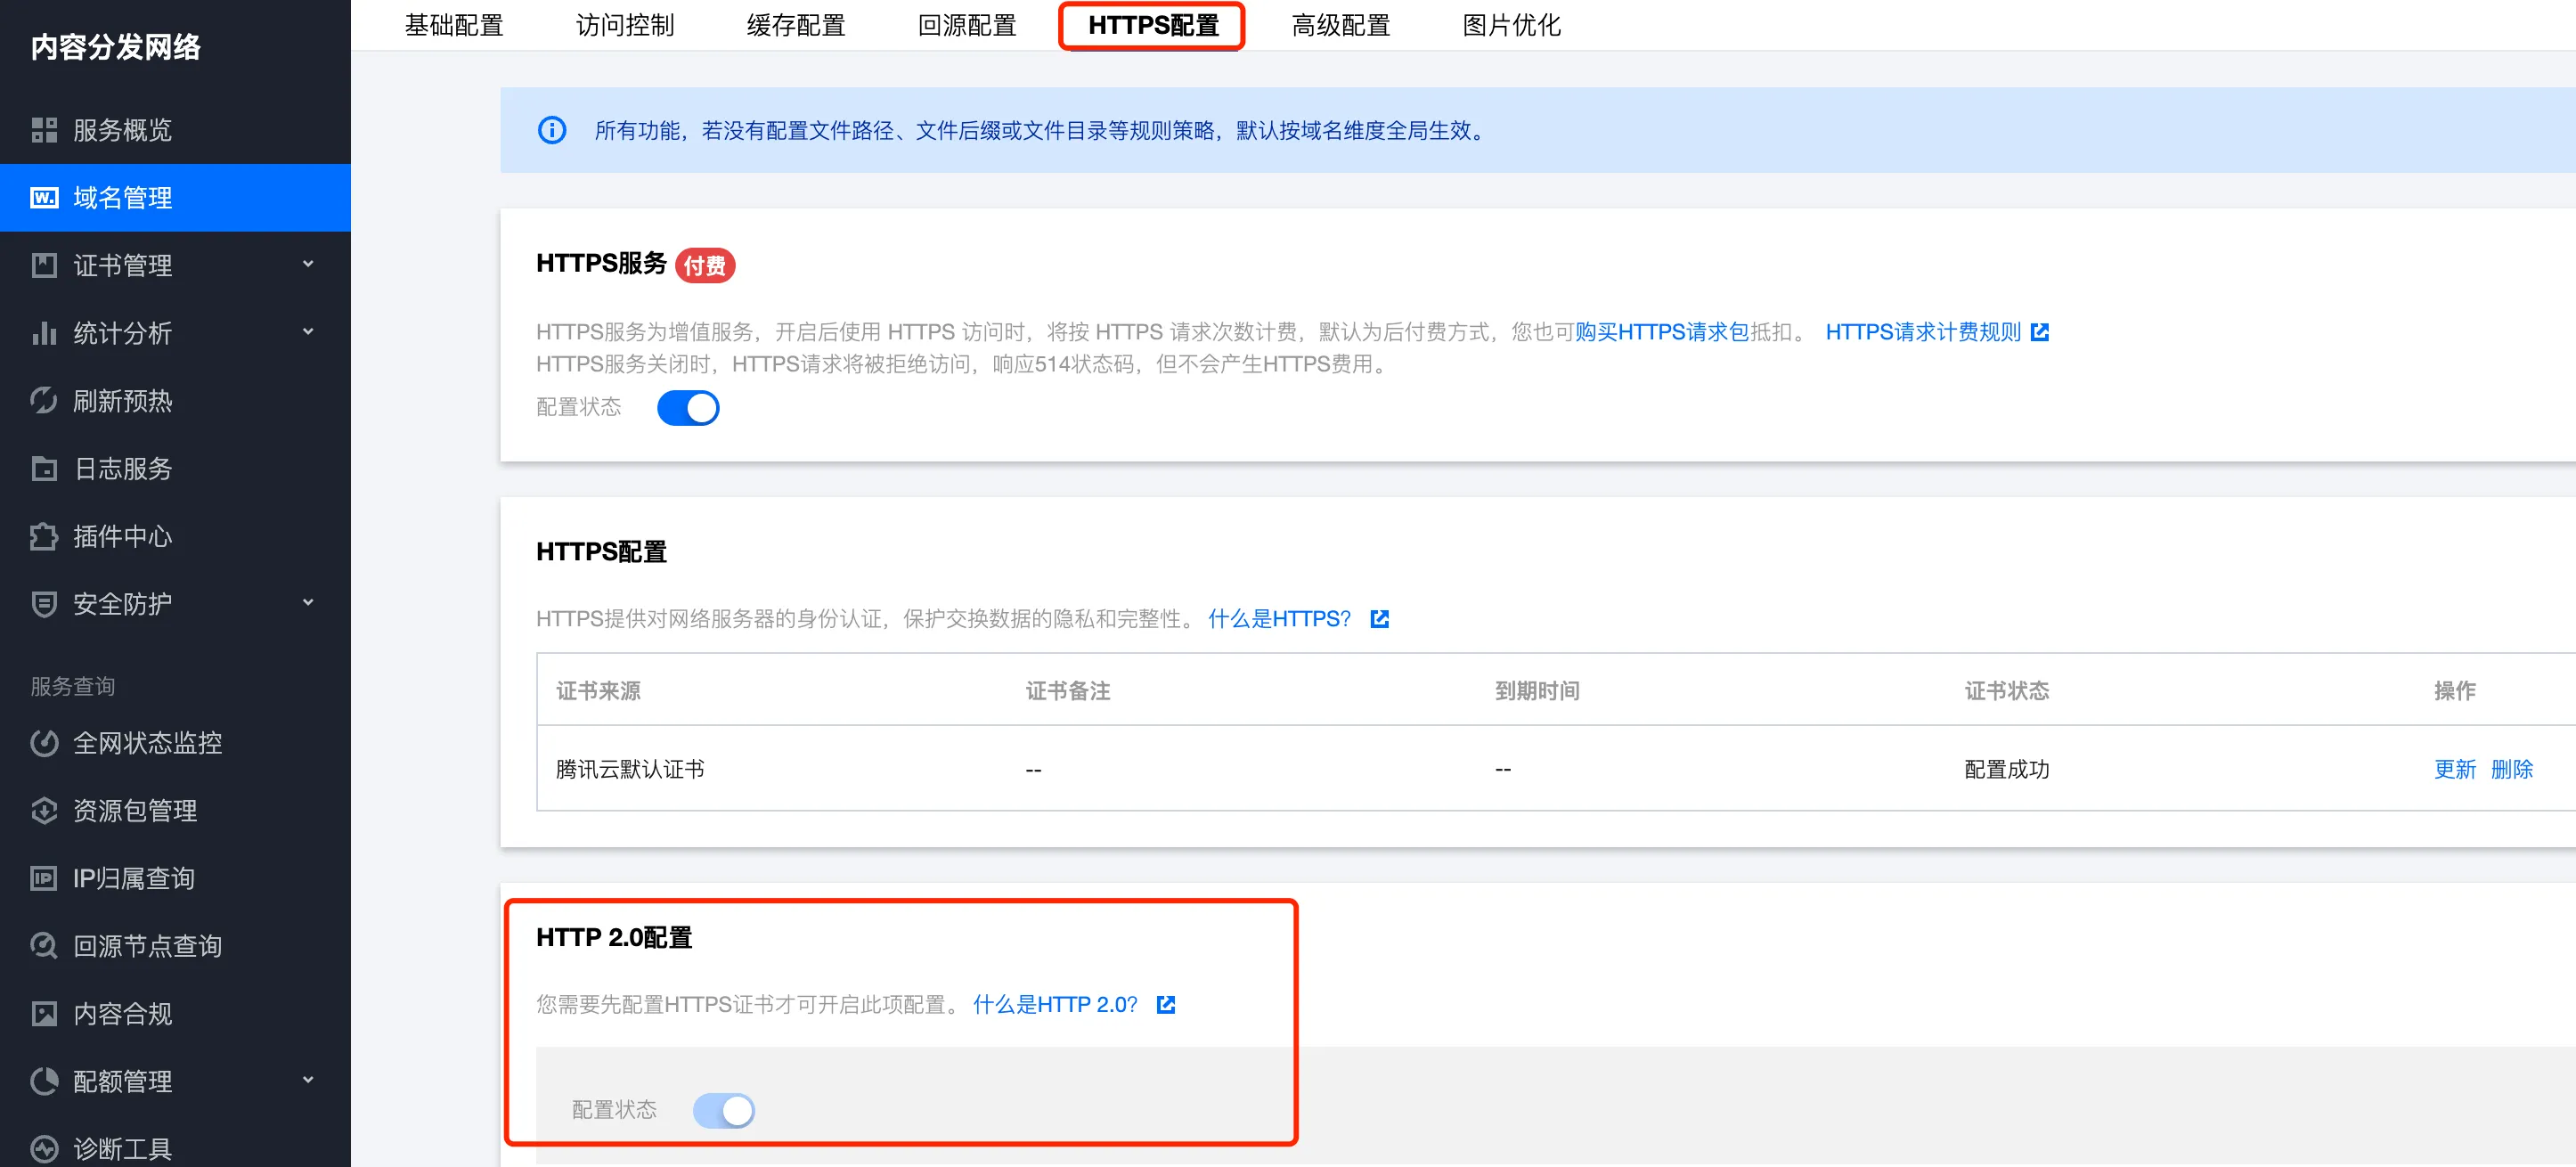
The final optimization is to make the requests in the blog use the HTTP2 protocol as much as possible. HTTP2 has made many optimizations and has significant improvements compared to HTTP1.1, which can effectively improve webpage loading speed. For example, it can use a single TCP connection to send multiple data streams at once, ensuring that no resource blocks other resources. The blog’s static resources are hosted on Netlify, which supports http2 by default, but some images and JS scripts inside don’t support http2. In the browser’s console tools, through the network tab, you can see the http2 support status for each resource.
The next step is to upgrade the http 1.1 requests to http2. The main focus is actually on images, because images are the bulk of the traffic. After putting the images on CDN, you can enable HTTP2. Taking Tencent Cloud as an example, as shown below:
After solving the image issue, only the Disqus comment system and Baidu’s statistics script are still using http1.1. I looked at Disqus’s official website but didn’t find how to enable http2. However, considering that the comment system is dynamically loaded here and doesn’t affect page loading speed, I’ll leave it for now. Baidu’s statistics script also doesn’t support http2, but considering that not much traffic comes from Baidu, and Baidu’s statistics are quite poor, I just removed Baidu statistics altogether. Currently, I’ve integrated Google Analytics and Cloudflare’s Web analytics, both of which support http2 and are sufficient for my needs.
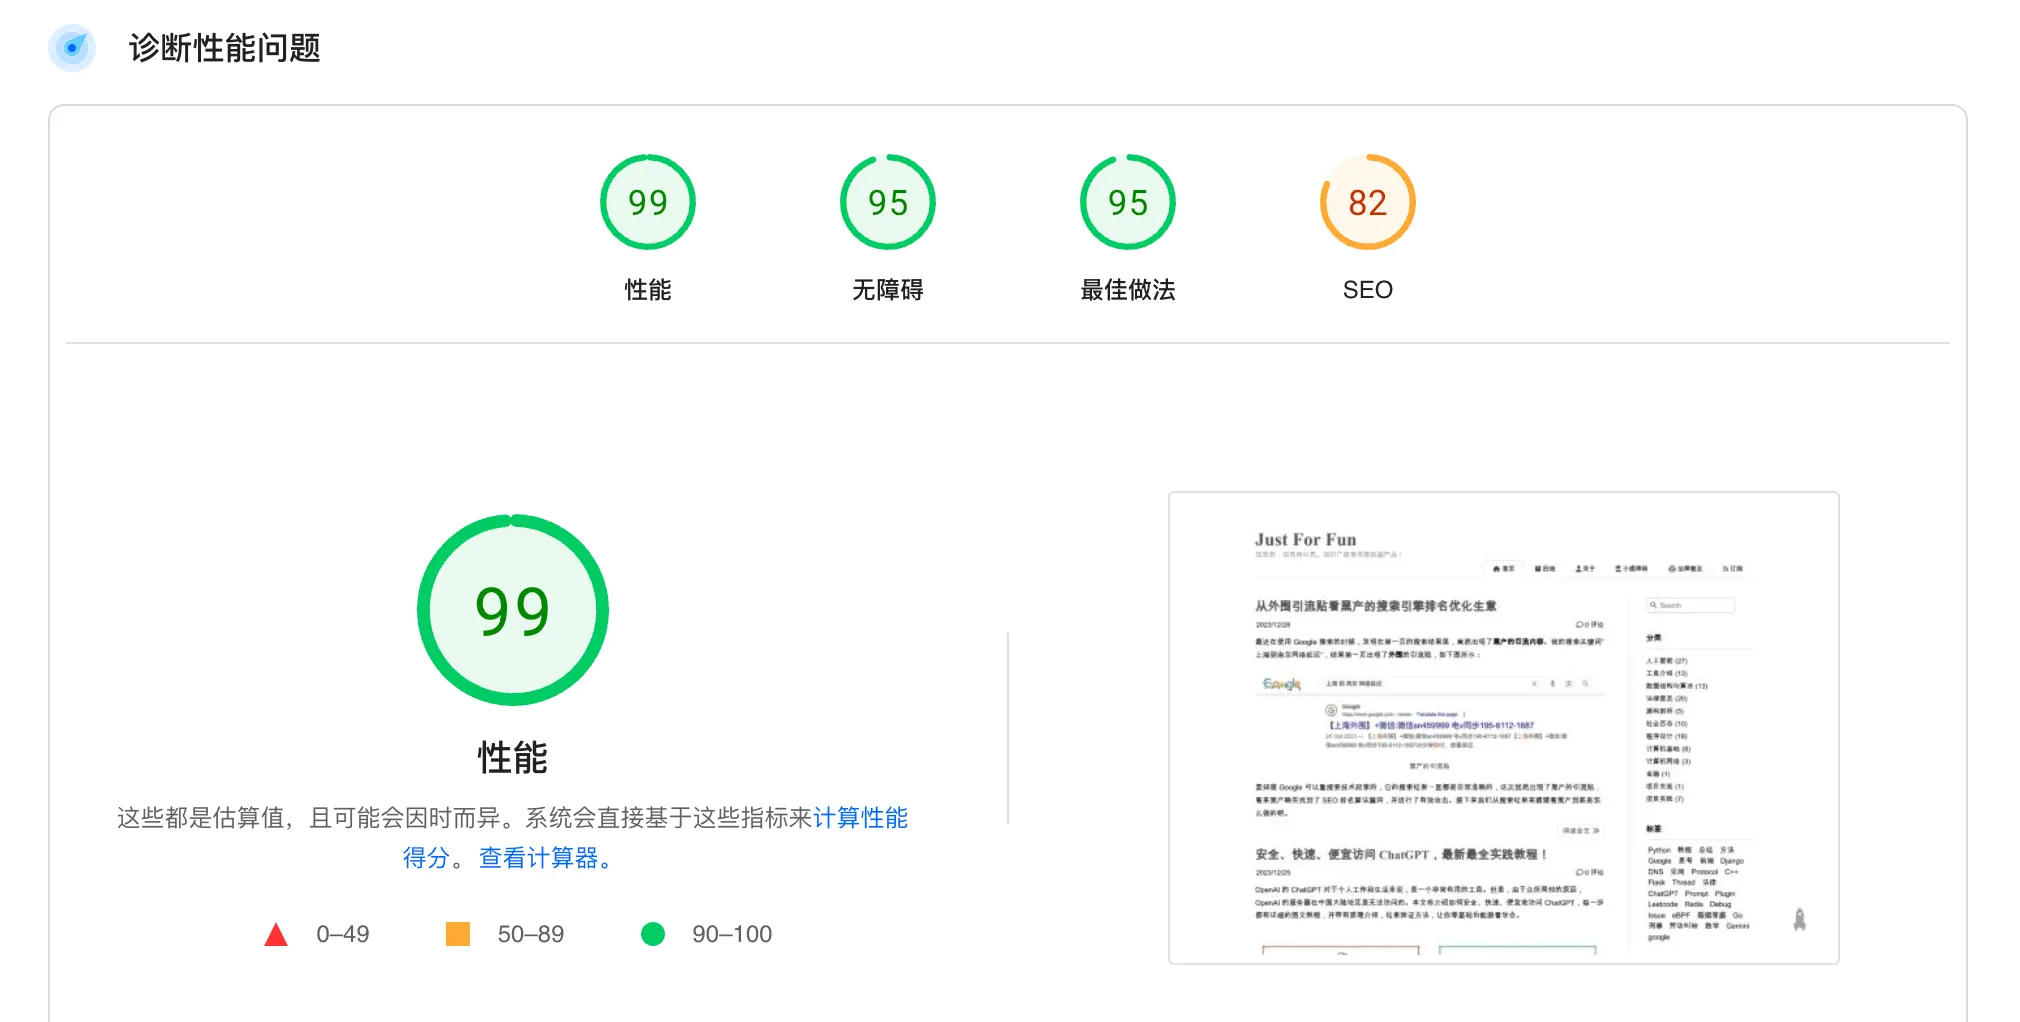
Effect Evaluation
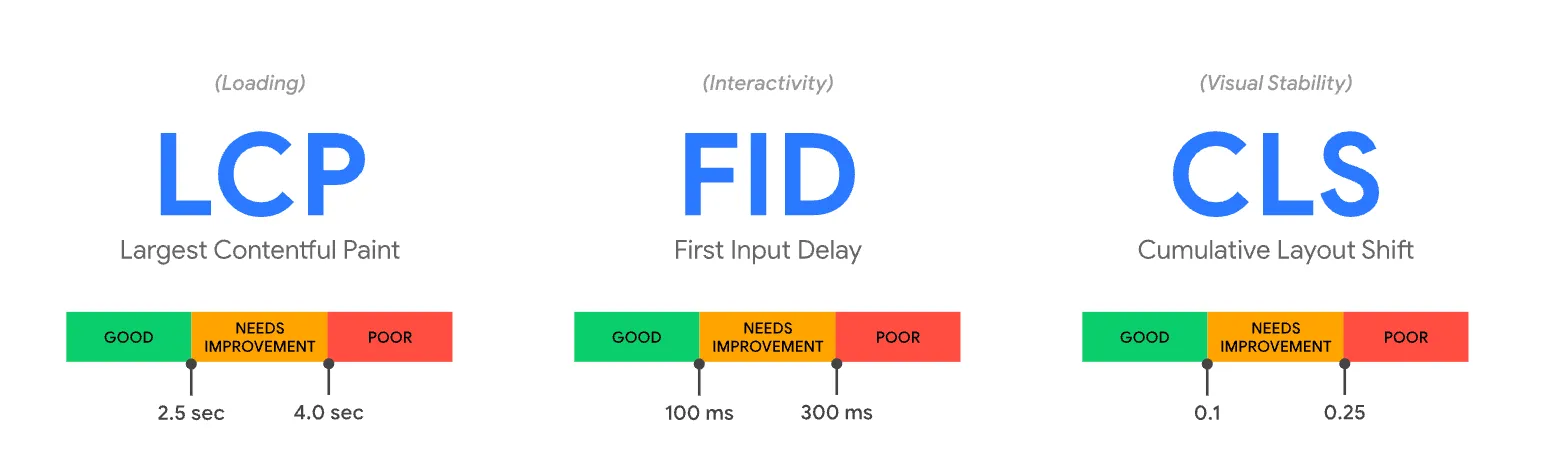
For webpage loading speed evaluation, I mainly used PageSpeed Insights and Google’s Lighthouse. Generally, several key metrics are used to evaluate webpages:
- FCP, First Contentful Paint, measures the time from when the user arrives at the webpage to when the browser renders the first piece of DOM content. Images, non-white elements, and SVGs on the webpage are all considered DOM content. Generally, anything within 1.8s is acceptable, and Google will consider it as Good.
- LCP, Largest Contentful Paint, is used to measure when the largest content element in the viewport is rendered to the screen. This roughly estimates when the main content of the webpage is visible to the user.
- FID, First Input Delay, measures the time from when a user first interacts with the webpage (e.g., clicking a link) to when the browser is actually able to begin processing event handler scripts to respond to that interaction.
The image below shows the distribution of effects for each metric:
There are some other metrics, which I won’t expand on here. Google’s Lighthouse provides more detailed optimization suggestions, such as:
- Reducing the size of CSS and JS;
- Removing unused CSS styles;
- Minimizing main thread delays
However, these optimizations don’t have a very obvious effect on overall improvement and require a considerable amount of time, so I didn’t implement these optimizations in the blog. After optimization, the performance score of this blog is basically above 95 points. However, these metrics are based on your current region. For example, if the CDN speed for image loading is very fast in your country, the evaluation here will certainly be good.
If you’ve used Cloudflare’s Web analytics, you can see the various metrics of actual users visiting the blog, as shown in the image below:
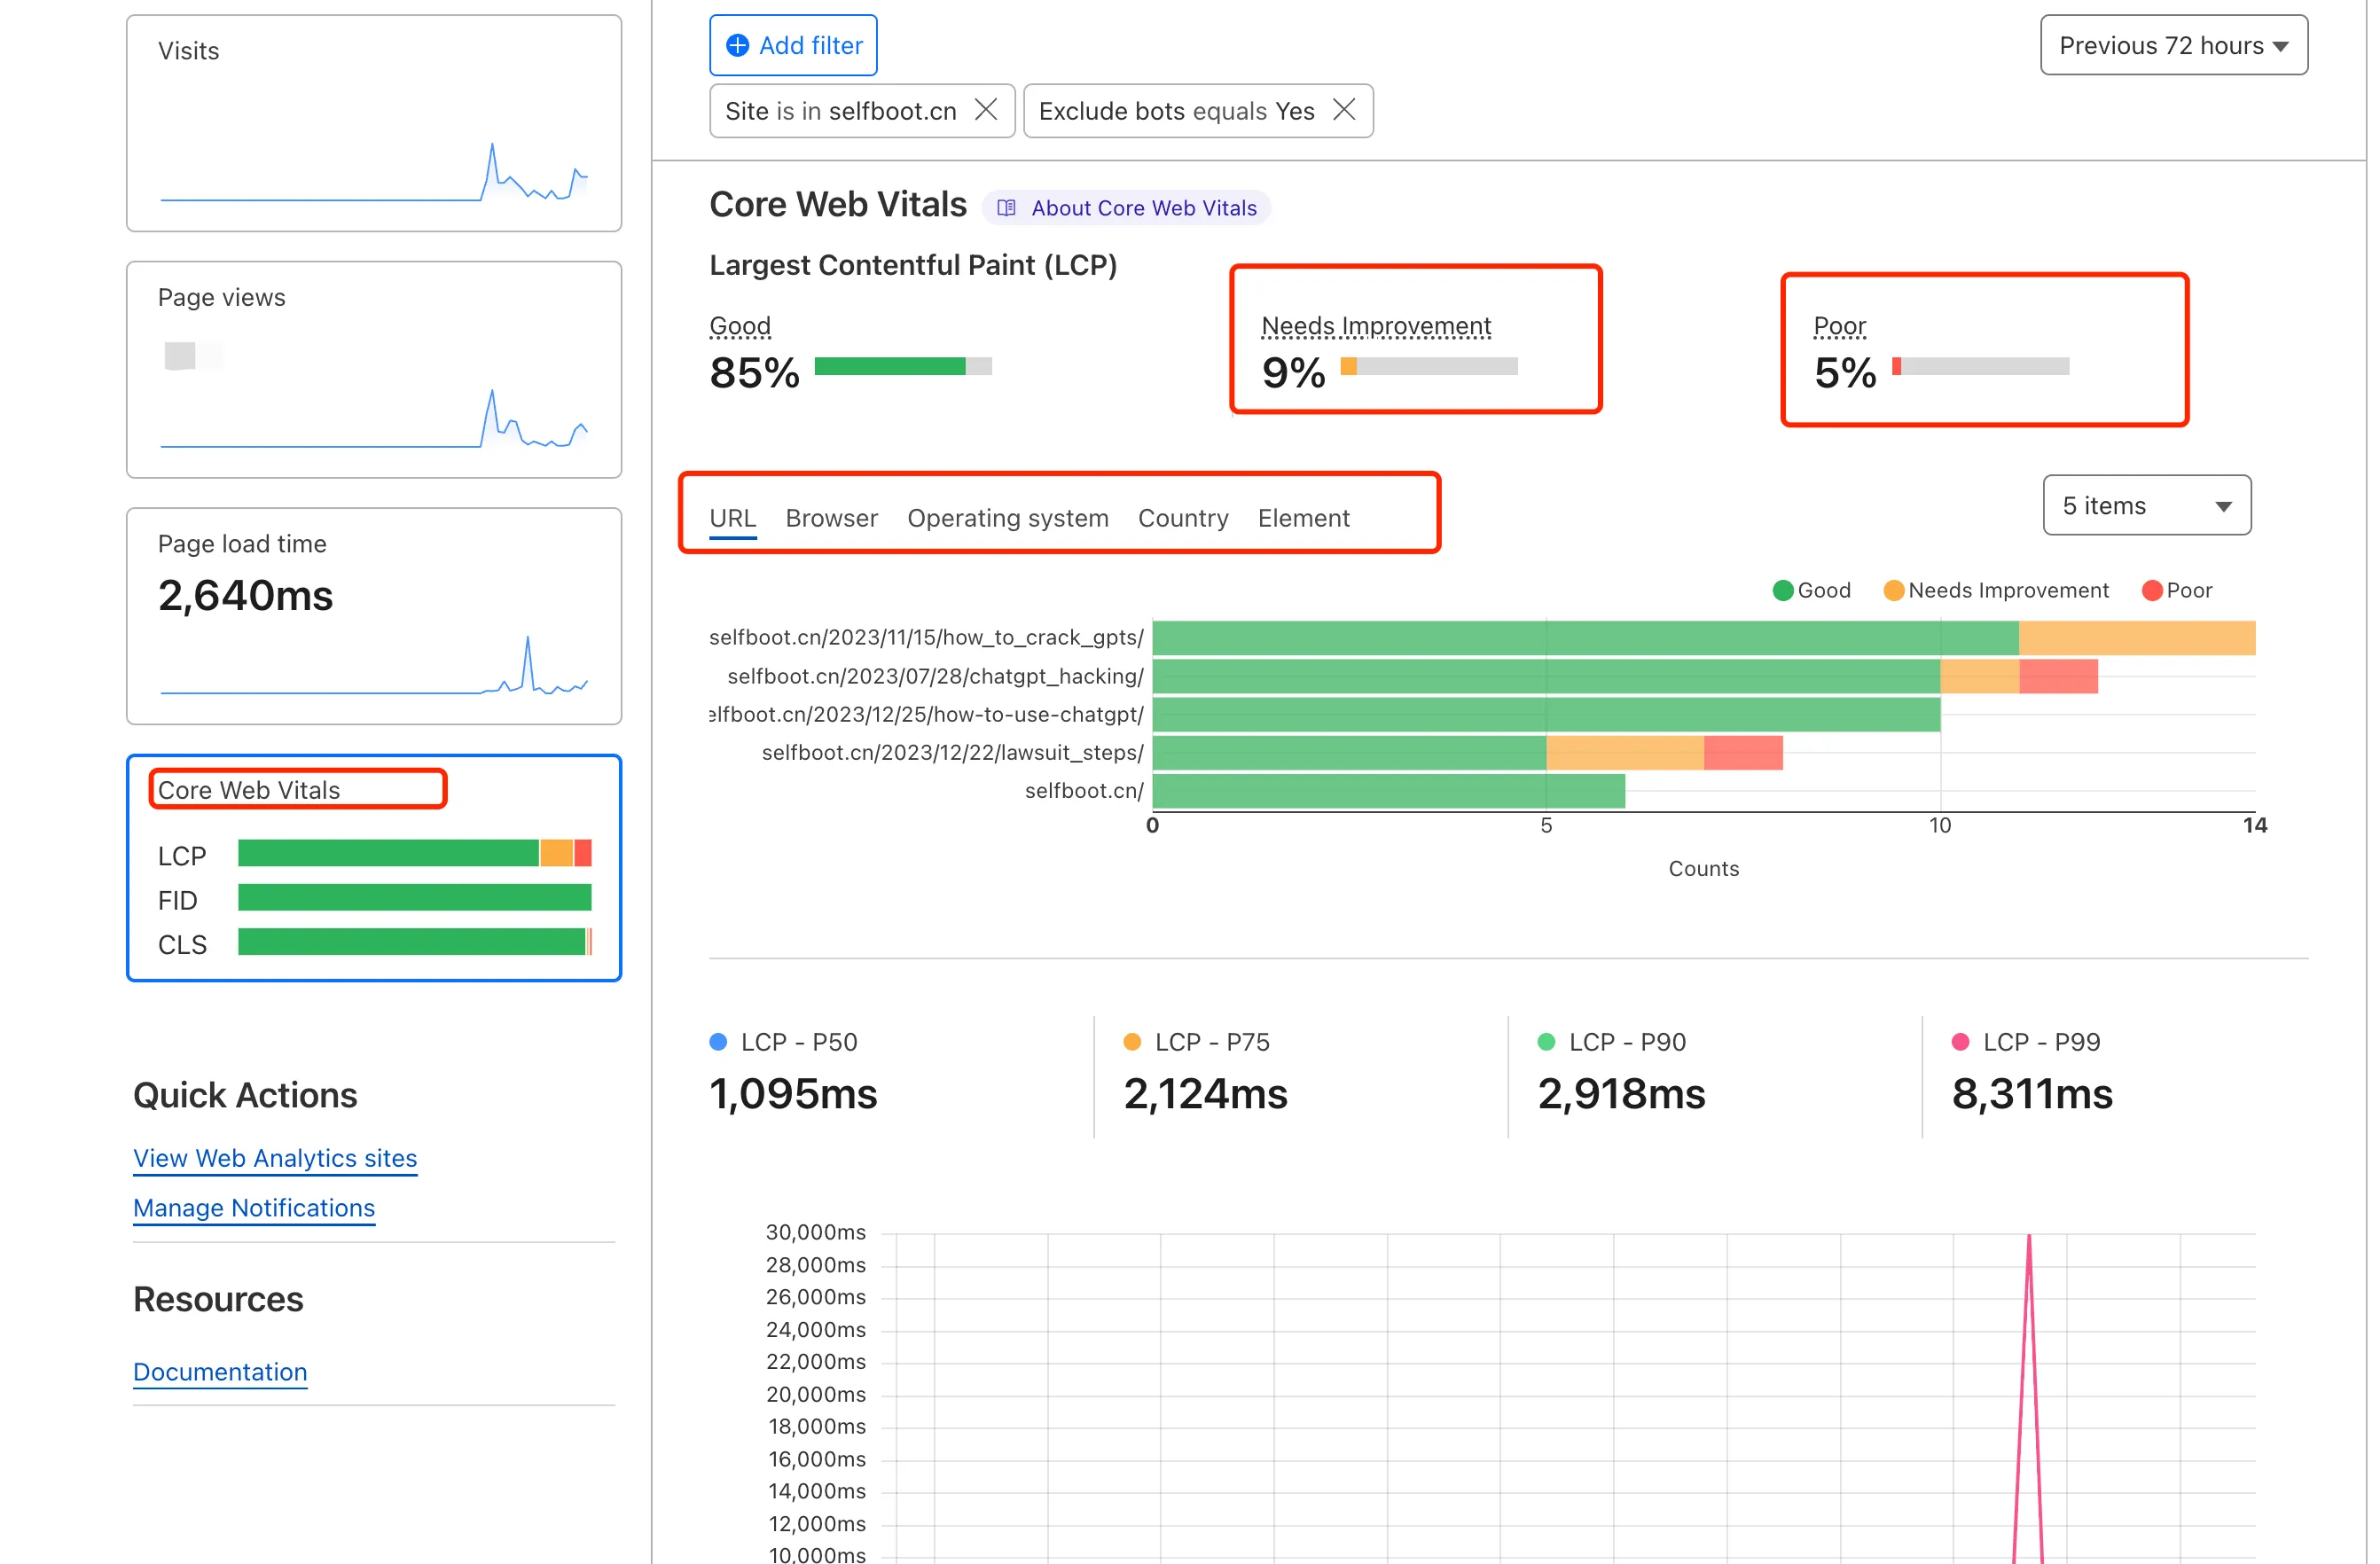
Here, 5% of LCP is Poor, mainly due to images in the blog. Some regions have slow network loading for images, and details are provided here, as follows:
1 | #layout>div.pure-u-1.pure-u-md-3-4>div.content_container>div.post>div.post-content>p>a.fancybox>img |
This shows that CDN acceleration can’t solve access issues for all regions 100%. Perhaps switching to a better CDN would improve things, but as a personal blog, I haven’t bothered to tinker with it further.
Reference Documents
Web Vitals
Eliminate render-blocking resources
An image format for the Web
RespImageLint - Linter for Responsive Images
Properly size images
Lighthouse performance scoring

