Understand Web Stream Output Implementation with Examples
If you’ve used large language models like ChatGPT, you may have noticed that the AI’s output text appears in “bursts” during chat conversations. This is known as stream output. How is this effect achieved in the browser?
This article will introduce 4 common methods to implement stream output effects, each demonstrated with practical examples. The choice of method in business applications depends on specific requirements and scenarios.
- Client-side polling: The client sends requests to the backend service at regular intervals (e.g., every few seconds) to retrieve new data.
- Chunked transfer: Supported by HTTP/1.1, the server can send only part of the response content at a time, and the client can start processing as soon as it receives partial data.
- Server-Sent Events: The server pushes information to the browser. The browser creates a one-way connection to the server, through which the server can send multiple messages.
- WebSocket: Establishes a persistent, full-duplex connection, allowing real-time, two-way communication between the server and client.
Simple Polling
First is the simplest polling method, where the client sends requests to the server at regular intervals to retrieve new data. When implementing polling, the client and server need to agree on how to indicate data updates or completion using HTTP request parameters and response. For example, a simple request field ‘cnt’ can be used to indicate which request this is, and a 400 error code in the response can indicate the end of polling.
Below is a simple example using Python’s FastAPI, where each request carries an index to request content from a text, and if it exceeds the text length, it returns a 400 error.
1 | async def polling(cnt: int = 1): |
Here is an interactive demonstration of polling:
After clicking start, you can see the data continuously updating until it ends. If you open the console, you’ll see the browser making an HTTP request every 100ms, with the parameter ‘cnt’ indicating which request it is.
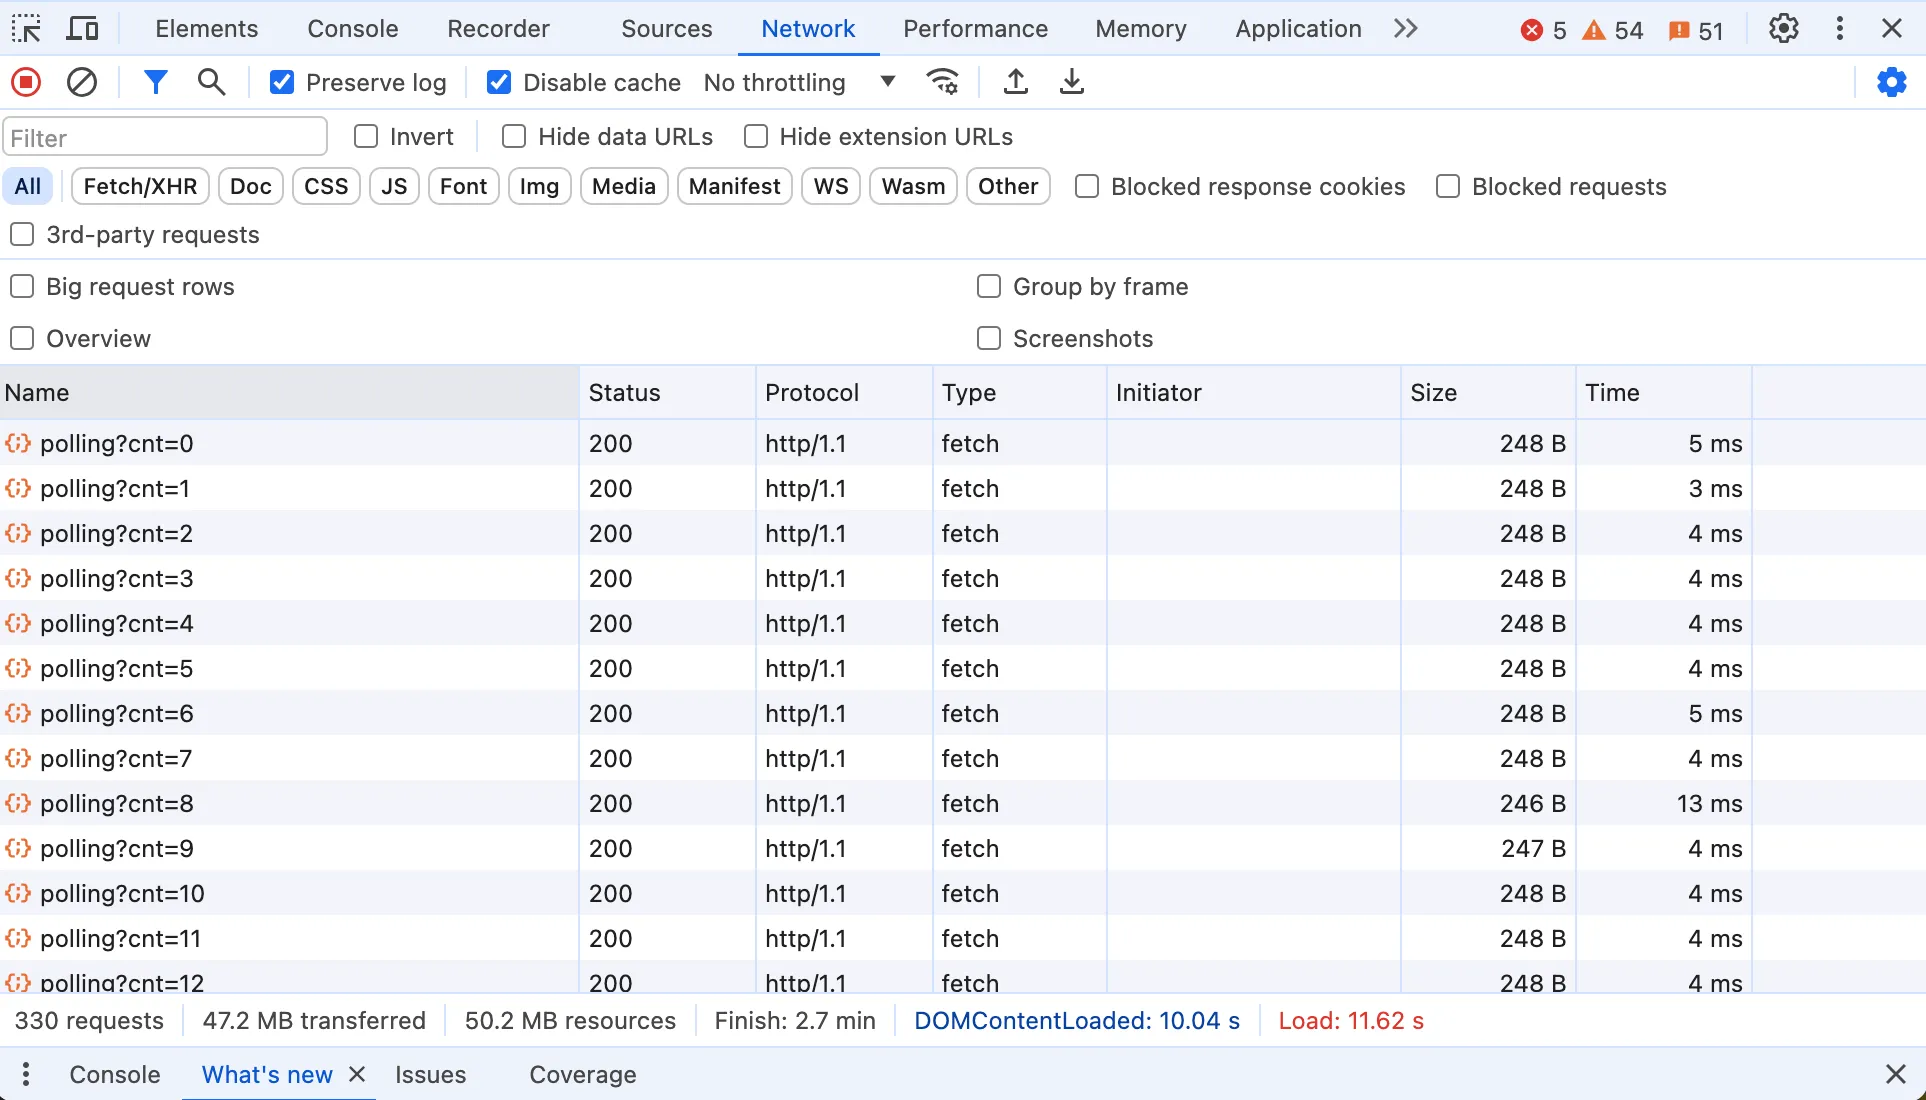
The advantage of this method is that it’s easy to understand and implement. However, the disadvantages are also obvious: frequent HTTP requests increase server load and network transmission overhead. With HTTP/1.1, each request needs to establish a TCP connection, increasing overhead even more. Additionally, the polling interval is difficult to control. If it’s too short, data might not have updated, wasting requests. If it’s too long, user experience suffers.
Chunked Transfer Encoding
The disadvantages of the polling mechanism above are evident, mainly due to the need for many HTTP connections to update data. In fact, HTTP/1.1 offers a better way: chunked transfer encoding. Chunked transfer encoding implements stream output more efficiently. The client only needs to request once, and the server responds in multiple “chunks” until all data is sent. Chunked transfer is suitable for situations where the response body is very large or its size is unknown due to real-time content generation, common in large file downloads, video streams, or real-time data streams. Currently, if you want to implement stream output in WeChat Mini Programs, chunked encoding is the most convenient method.
The chunked transfer encoding protocol is slightly more complex. The response header uses Transfer-Encoding: chunked to indicate that the response will be sent in chunks. Before each chunk, the server sends a line containing the size of the current chunk, followed by a carriage return and line feed (CRLF), then the actual chunk data, followed by another CRLF. When the transmission ends, the server sends a chunk of size 0, indicating no more data chunks, usually followed by a CRLF.
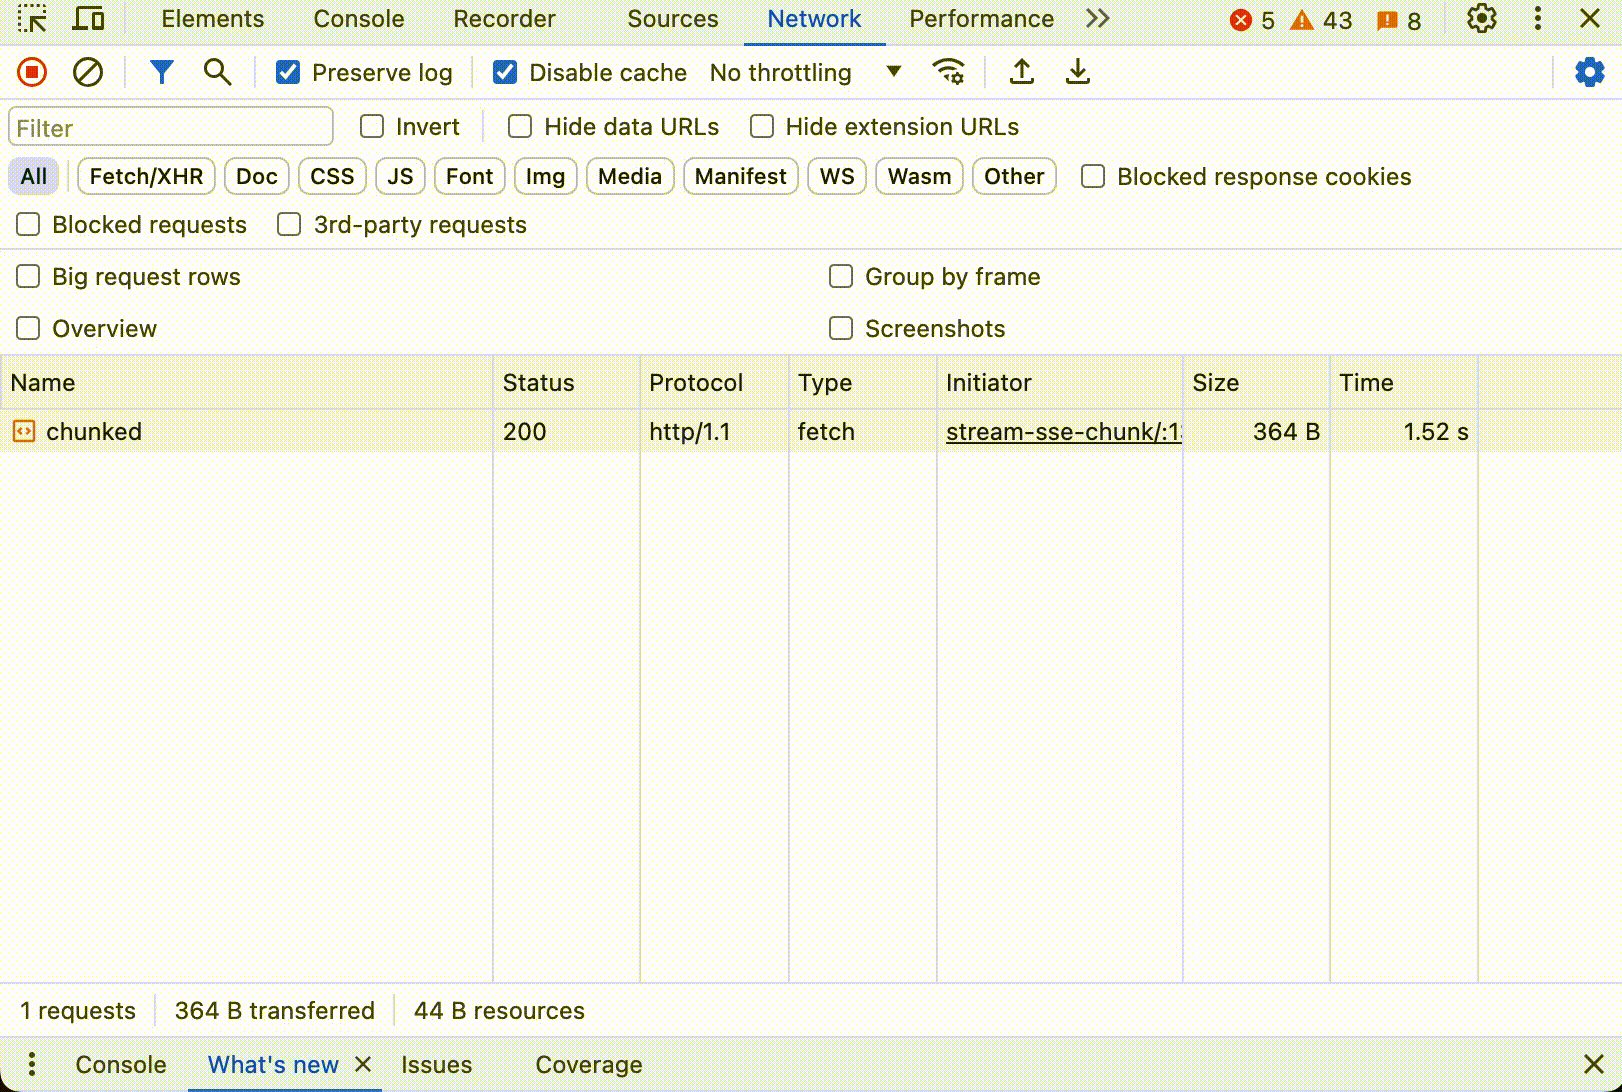
Implementing the chunked encoding protocol with Python’s FastAPI is also relatively simple. Below is a simple example that outputs content every 100ms and transmits it using chunked encoding:
1 |
|
Here is an interactive demonstration of chunked transfer encoding:
After clicking start, you can similarly see the data continuously updating until all content is printed. If you open the console, you’ll see the browser only sends one HTTP request, and the response header contains Transfer-Encoding: chunked. The size of the response data keeps updating over time. Below is an animated GIF:
It’s worth noting that chunked transfer encoding is only supported in HTTP/1.1. In HTTP/2, the concept of chunked transfer encoding no longer exists, mainly because HTTP/2 works very differently. HTTP/2 introduced new mechanisms such as multiplexing, binary framing, and stream prioritization to improve efficiency and performance. In HTTP/2, all communication occurs through frames on a single TCP connection. Data frames are used to transmit message body data. The server can continuously send multiple data frames as needed, with each frame carrying a portion of the message content. The client reassembles these frames in the order received to reconstruct the complete message.
However, in my example here, stream output still works under HTTP/2. This is because the frontend uses the Fetch API and stream processing response.body.getReader().read(), which provide a consistent interface for handling stream data, regardless of whether the underlying protocol is HTTP/1.1 or HTTP/2. When calling an HTTP/2 interface, it can still read data normally from the data frames.
Server-Sent Events
OpenAI doesn’t use the two methods above in its chat tool ChatGPT, but instead uses Server-Sent Events (SSE) to implement stream output. SSE allows servers to proactively push events to browsers or other clients. SSE is designed primarily to simplify unidirectional real-time data streams from server to client, particularly suitable for Web applications that require fast, continuous data updates, such as real-time news updates, stock quotes, or social media real-time messages.
SSE is based on the HTTP protocol and uses standard HTTP requests to initiate connections. First, the client initiates a standard HTTP GET request to start an SSE connection. The request header usually includes Accept: text/event-stream, telling the server that the client wants to open an SSE connection. The server responds to this request and keeps the connection open, with the Content-Type of the response set to text/event-stream. Subsequently, the server can send event streams in plain text form. Each event consists of an optional event name and a required data field. Events start with data:, followed by the specific message data, with events separated by two newline characters \n\n. Throughout the process, the HTTP connection remains open, allowing the server to send new events at any time, with the client processing the data upon receiving each event. Once an SSE connection is established, the server can continuously send data updates to the client until the connection is closed.
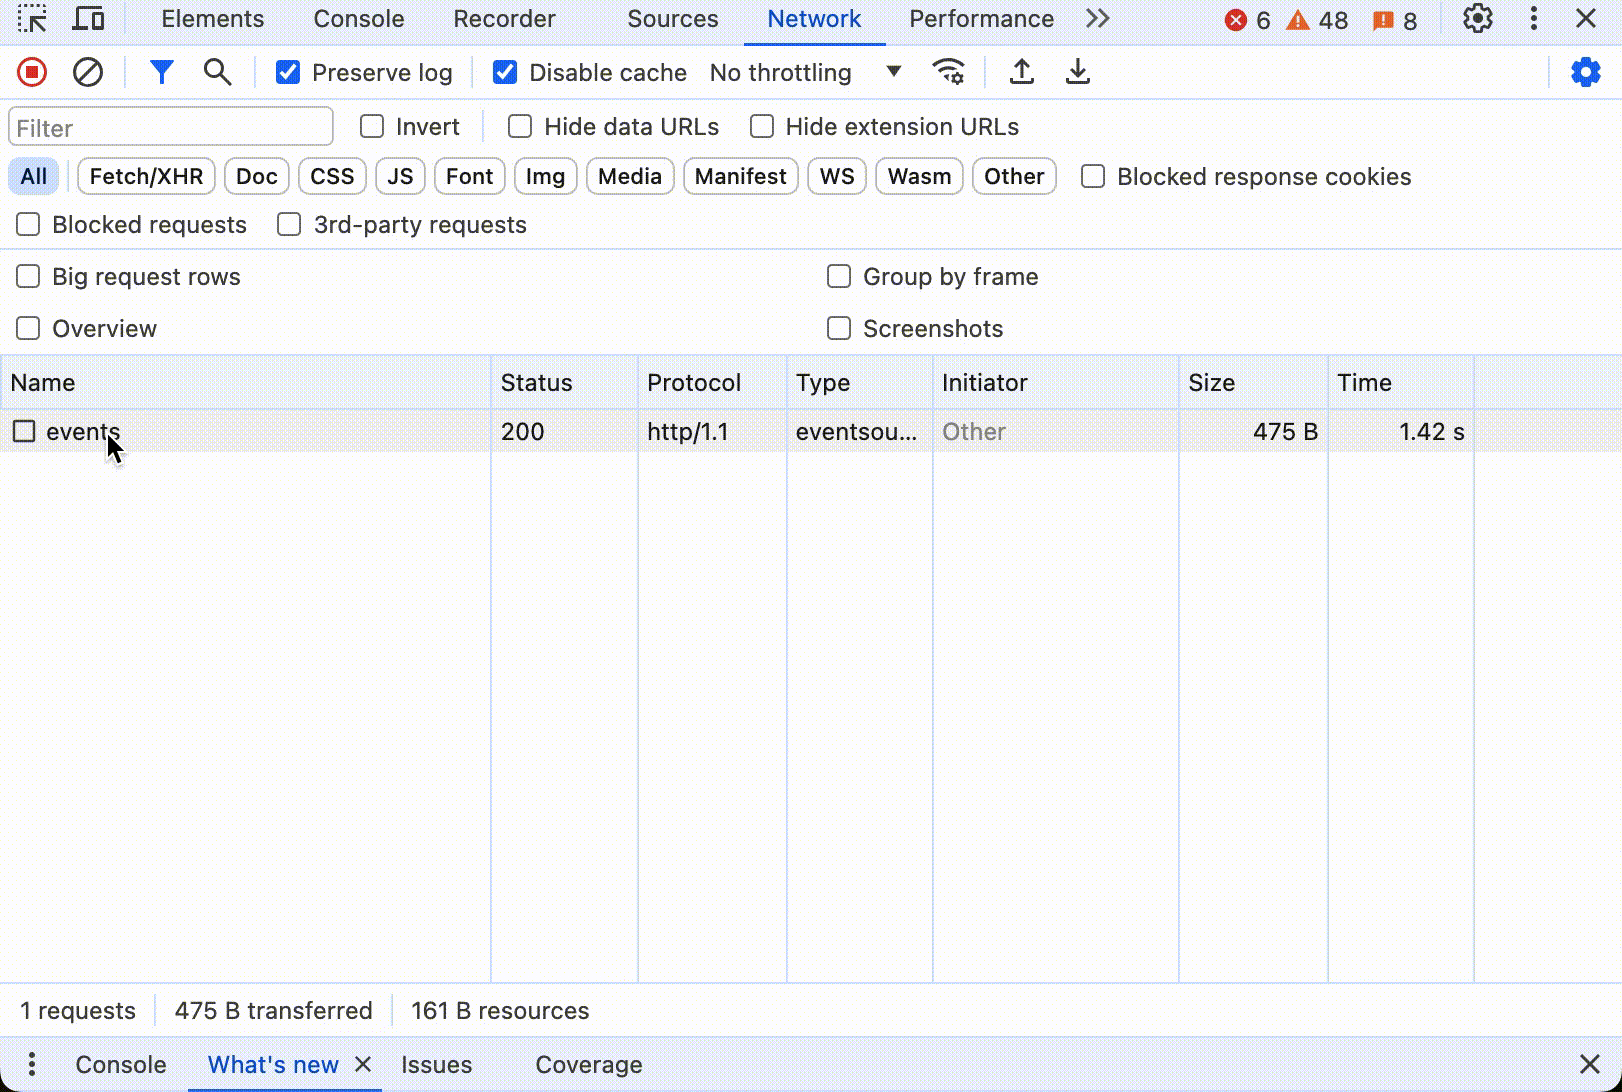
Implementing SSE with Python’s FastAPI is relatively simple. Below is a simple example that returns content to the client every 100ms, and the server ends the connection after all content is output:
1 |
|
Here is an interactive demonstration of SSE:
After clicking start, you can see the data continuously updating until all content is printed. If you open the console, you’ll see the browser only sends one HTTP request, and the response header contains Content-Type: text/event-stream. The size of the response data keeps updating over time. Below is an animated GIF of the entire process:
Most modern browsers support SSE, which provides a good user experience and is very resource-efficient. However, SSE has one drawback: it only allows unidirectional transmission from server to client, and the client cannot send data to the server. If bidirectional communication is needed, WebSocket should be used.
WebSocket
The three methods mentioned above are all based on the HTTP protocol, mainly to solve the problem of pushing data from server to client. WebSocket, on the other hand, is an independent protocol that allows real-time, bidirectional communication between client and server, effectively supporting complex interactive applications such as online games, trading platforms, and collaboration tools.
WebSocket is also implemented based on the TCP protocol, with the specific protocol defined by IETF’s RFC 6455. First is the handshake phase, where a WebSocket connection is initiated through the HTTP protocol. The client needs to send a special HTTP request including the Upgrade: websocket and Connection: Upgrade headers, requesting the server to switch to the WebSocket protocol. If the server supports WebSocket, it will return an HTTP response code 101 Switching Protocols, indicating agreement to switch to WebSocket.
Once the handshake is successful, the connection is upgraded to WebSocket, and both parties can start sending data through frames. The WebSocket protocol defines various frame types for transmitting data, closing connections, ping/pong, etc. The WebSocket protocol supports both text and binary messages, allowing messages to be sent in a single frame or in fragments.
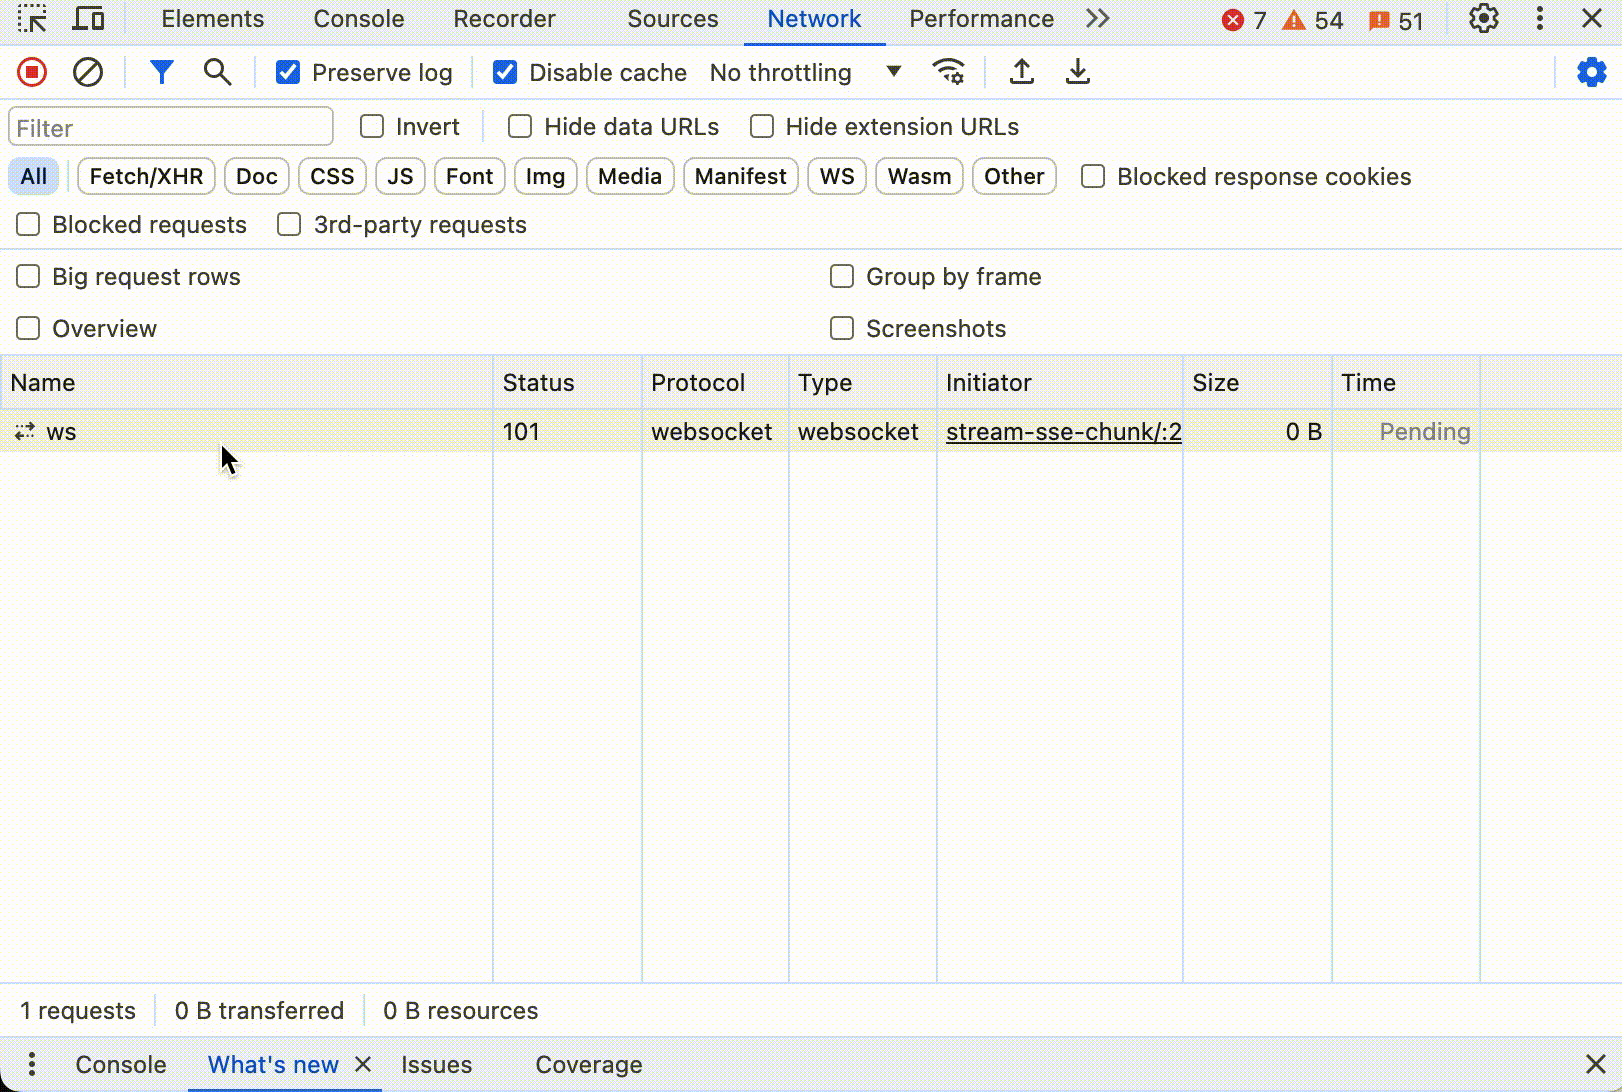
Here’s how to implement a WebSocket server using Python’s FastAPI:
1 |
|
Here is an interactive demonstration of WebSocket:
After starting here, you can see the data transmitted in the WebSocket in the console. Chrome’s developer tools have a message status bar where you can see the data content throughout the full-duplex communication process. Below is an animated GIF of the entire process:
Of course, the WebSocket protocol is more complex compared to HTTP, requiring both the server and client to implement more logic.
This article has introduced 4 common methods for implementing stream output, each with its own advantages and disadvantages, suitable for different scenarios. Here are some suggestions:
- For simple unidirectional push scenarios, such as real-time news updates or stock quotes, consider using Server-Sent Events. It’s simple to implement, supported by mainstream browsers, and can effectively save server resources.
- For interactive scenarios requiring bidirectional communication, such as instant messaging, collaborative office work, or online games, WebSocket is a more suitable choice. It offers full-duplex communication, supports text and binary data, and has low latency. However, it requires both client and server to implement WebSocket protocol logic.
- If latency requirements are not too high, consider using polling or chunked transfer encoding. Polling is the simplest to implement, but frequent requests increase server load. Chunked transfer encoding is more efficient and doesn’t require frequent connection establishment.
- For applications that need to support older browsers, polling might be the only option, as older browser versions may not support WebSocket or Server-Sent Events.
Overall, stream output has been increasingly widely used in modern Web applications. Especially after the rise of large language models, almost all text generation applications use stream output to enhance user experience.

